Introduction
Bevy shader playground is a playground to explore and mess with shaders using Bevy. I recently found myself fascinated by shaders and wanted to learn more about them. I started with the great Learn Wgpu tutorial and then found a really neat tutorial by hakolao which explores compute shaders with Bevy using Vulkano. If you are interested, this is the tutorial compute_shader_tutorial.
Jump right into the Bevy Game of Life Shader tutorial.
License
Licensed under either of
- Apache License, Version 2.0 (LICENSE-APACHE or https://www.apache.org/licenses/LICENSE-2.0)
- MIT license (LICENSE-MIT or https://opensource.org/licenses/MIT) at your option.
Contributing
Unless you explicitly state otherwise, any contribution intentionally submitted for inclusion in the work by you, as defined in the Apache-2.0 license, shall be dual licensed as above, without any additional terms or conditions. You can find the source code on GitHub and issues and feature requests can be posted on the GitHub issue tracker. Ff you'd like to contribute, please read the CONTRIBUTING guide and consider opening a pull request.
Bevy Game of Life Example
This is a mini-tutorial series where I explore how bevy setups up compute shaders using the infamous game of life example. I further expand on the example by adding some new featues:
- Camera Controller
- Wrapping Simulation
- Drawing on the simulation
Game of Life simulation:
Game of Life simulation with drawing:
Full source code can be found here
Bevy Game of Life Shader Example Part 1
As a fun exercise, I decided to explore using compute shaders using wgpu within bevy. This is part 1 of exploring bevy game of life shader example, and some ways to enhance the experience.
I assume you have general knowledge of rust, bevy, and wgpu, but I will still explain somethings along the way. If you need a refresher on anything, here are some helpful resources:
If you are still ready, lets get started!
Setup
This tutorial currently follows along using Bevy 0.10
I am using the bevy_game_template as my starter, just with all the extra code ripped out, except for main and lib.
// main.rs

// <imports>
...

fn main() {
    App::new()
        .insert_resource(ClearColor(Color::BLACK))
        .add_plugins(DefaultPlugins.set(WindowPlugin {
            primary_window: Some(Window {
                canvas: Some("#shader_playground".to_owned()),
                title: "Shader Playground".to_string(),
                present_mode: bevy::window::PresentMode::AutoNoVsync, // unthrottled FPS
                ..default()
            }),
            ..default()
        }))
        .add_plugin(ShaderPlaygroundPlugin)
        .add_system(set_window_icon.on_startup())
        .run();
}

// <window_icon sys>
...
// lib.rs

// <imports>
...

const SIM_SIZE: (u32, u32) = (1280, 720);
const WORKGROUP_SIZE: u32 = 8;

pub struct ShaderPlaygroundPlugin;
impl Plugin for ShaderPlaygroundPlugin {
    fn build(&self, app: &mut App) {
        app.add_plugin(FrameTimeDiagnosticsPlugin::default())
            .add_system(window_fps);
    }
}

fn window_fps(diagnostics: Res<Diagnostics>, mut windows: Query<&mut Window, With<PrimaryWindow>>) {
    if let Ok(mut window) = windows.get_single_mut() {
        if let Some(fps_diagnostic) = diagnostics.get(FrameTimeDiagnosticsPlugin::FPS) {
            if let Some(fps_smoothed) = fps_diagnostic.smoothed() {
                window.title = format!("{fps_smoothed:.2}");
            }
        }
    }
}
Pretty simple setup. Just added a simple fps system to print the FPS at the top of the window. We need to setup our canvas for our simulation.
We will just use a simple image constrained to our SIM_SIZE variable. You can organize your code how you feel, but I will be breaking out the code
from the original example into separate files for readability.
// image.rs

#[derive(Resource, Clone, Deref, ExtractResource)]
pub struct GameOfLifeImage(pub Handle<Image>);

pub fn create_image(width: u32, height: u32) -> Image {
    let mut image = Image::new_fill(
        Extent3d {
            width,
            height,
            depth_or_array_layers: 1,
        },
        TextureDimension::D2,
        &[0, 0, 0, 255],
        TextureFormat::Rgba8Unorm,
    );

    image.texture_descriptor.usage =
        TextureUsages::COPY_DST | TextureUsages::STORAGE_BINDING | TextureUsages::TEXTURE_BINDING;

    image
}
This is just a simple helper function to create an image. We will be using this to create our simulation image. GameOfLifeImage will hold a reference to our
handle image so that it doesn't get unloaded. You will see it is annotated with ExtractResource derive. This is required to extract the image from the main bevy
world into the render world. You can also manually derive this, if needed. Lets use it within our setup function. Back in
lib.rs:
...
fn setup(mut commands: Commands, mut images: ResMut<Assets<Image>>) {
    let image = image::create_image(SIM_SIZE.0, SIM_SIZE.1);
    let image = images.add(image);

    commands.spawn(SpriteBundle {
        sprite: Sprite {
            custom_size: Some(Vec2::new(SIM_SIZE.0 as f32, SIM_SIZE.1 as f32)),
            ..default()
        },
        texture: image.clone(),
        ..default()
    });

    commands.spawn(Camera2dBundle::default());
    commands.insert_resource(image::GameOfLifeImage(image));
}
Quick and easy. Just create our image, create a sprite based off the image, spawn a 2D camera, and then inject our resource into bevy world. Now we just need to hookup our system back in the plugin.
fn build(&self, app: &mut App) {
    app.add_plugin(FrameTimeDiagnosticsPlugin::default())
        .add_startup_system(setup)
        .add_system(window_fps);
}
Running the simulation should produce a black screen and nothing more. But hey! No errors! Lets move on.
As mentioned earlier, bevy has a render world which is extracted each render instance. We need to tell our render setup how to access members from the main world.
In our plugin, add the ExtractResourcePlugin for our GameOfLifeImage resource.
...
// Extract the game of life image resource from the main world into the render world
// for operation on by the compute shader and display on the sprite.
app.add_plugin(ExtractResourcePlugin::<GameOfLifeImage>::default());
...
Now onto the actual meat of why I am writing this. Lets get into wgpu. We will be using a compute shader, so our pipeline will need to be a ComputePipeline.
A pipeline describes all the actions the gpu will perform when acting on a set of data
Lets create a new file, pipeline.rs and add the following:
use bevy::{prelude::*, render::render_resource::*};

#[derive(Resource)]
pub struct GameOfLifePipeline {
    init_pipeline: CachedComputePipelineId,
    update_pipeline: CachedComputePipelineId,
    texture_bind_group_layout: BindGroupLayout,
}

impl FromWorld for GameOfLifePipeline {
    fn from_world(world: &mut World) -> Self {}
}
Our pipeline resource holds the two compute pipeline id's we will be using init (for setup) and update (for each frame). We also need to hold onto the bind group layout.
a bind group layout is a way to describe the structure of resources that a shader will access during execution. The resources include buffers, textures, and samplers
Lets expand upon our FromWorld implementation.
impl FromWorld for GameOfLifePipeline {
    fn from_world(world: &mut World) -> Self {
        let texture_bind_group_layout =
            world
                .resource::<RenderDevice>()
                .create_bind_group_layout(&BindGroupLayoutDescriptor {
                    label: Some("Game of Life Bind Group Layout"),
                    entries: &[BindGroupLayoutEntry {
                        binding: 0,
                        visibility: ShaderStages::COMPUTE,
                        ty: BindingType::StorageTexture {
                            access: StorageTextureAccess::ReadWrite,
                            format: TextureFormat::Rgba8Unorm,
                            view_dimension: TextureViewDimension::D2,
                        },
                        count: None,
                    }],
                });

        let pipeline_cache = world.resource::<PipelineCache>();
        let shader = world
            .resource::<AssetServer>()
            .load("shaders/game_of_life.wgsl");

        ...
WHOA! What is this weird layout stuff? First thing first, the RenderDevice is equivalent to wgpu::Device. We are just using the bevy wrapper.
I like to add labels to all my shader creations, just to make it easier to track bugs when they do arise. This layout is telling the pipeline that at
binding(0) we expect there to be a binding of type StorageTexture, that is read_write, and has the format of Rgba8Unorm.
We then pull the pipeline cache to create our pipelines and pull our shader from the asset's folder.
Compute Shaders
A compute shader is simply a shader that allows you to leverage the GPU's parallel computing power for arbitrary tasks. You can use them for anything from creating a texture to running a neural network. I'll get more into how they work in a bit, but for now suffice to say that we're going to use them to create the vertex and index buffers for our terrain. As of writing, compute shaders are still experimental on the web. You can enable them on beta versions of browsers such as Chrome Canary and Firefox Nightly. Because of this I'll cover a method to use a fragment shader to compute the vertex and index buffers after we cover the compute shader method.
    let init_pipeline = pipeline_cache.queue_compute_pipeline(ComputePipelineDescriptor {
        shader: shader.clone(),
        shader_defs: vec![],
        layout: vec![texture_bind_group_layout.clone()],
        entry_point: Cow::from("init"),
        push_constant_ranges: Vec::new(),
        label: Some(std::borrow::Cow::Borrowed("Game of Life Init Pipeline")),
    });
    let update_pipeline = pipeline_cache.queue_compute_pipeline(ComputePipelineDescriptor {
        shader,
        shader_defs: vec![],
        layout: vec![texture_bind_group_layout.clone()],
        entry_point: Cow::from("update"),
        push_constant_ranges: Vec::new(),
        label: Some(std::borrow::Cow::Borrowed("Game of Life Update Pipeline")),
    });

    GameOfLifePipeline {
        texture_bind_group_layout,
        init_pipeline,
        update_pipeline,
    }
The init and update pipeline use the same layout and shader. We are not using push constants yet, so we can leave that as an empty vector, same with shader_defs. The important part is the entry_point. This is the name of the function in the shader that will be executed.
Lets quickly setup our shader and then we can move onto the actual compute shader.
// assets/game_of_life.wgsl

@group(0) @binding(0)
var texture: texture_storage_2d<rgba8unorm, read_write>;

@compute @workgroup_size(8, 8, 1)
fn init(@builtin(global_invocation_id) invocation_id: vec3<u32>, @builtin(num_workgroups) num_workgroups: vec3<u32>) {}

@compute @workgroup_size(8, 8, 1)
fn update(@builtin(global_invocation_id) invocation_id: vec3<u32>) {}
We can see that from what we defined in our BindGroupLayoutDescriptor that we define a texture_storage_2d<rgba8unorm, read_write> at binding(0). Looking
back at our descriptor:
BindGroupLayoutDescriptor {
    label: Some("Game of Life Bind Group Layout"),
    entries: &[BindGroupLayoutEntry {
        binding: 0,
        visibility: ShaderStages::COMPUTE,
        ty: BindingType::StorageTexture {
            access: StorageTextureAccess::ReadWrite,
            format: TextureFormat::Rgba8Unorm,
            view_dimension: TextureViewDimension::D2,
        },
        count: None,
    }],
}
We see that our BindGroupLayoutEntry matches what we expect at group(0) binding(0). This has to match 1:1, otherwise wgpu will panic on run.
Afterwards, we simply just adds our entry points that we defined in the pipeline's. The @workgroup_size is the size of the workgroup that will be
executed on the gpu. Bevy example uses 8.
Let's add our newly created pipeline resource to the render world. Back in the plugin:
...
let render_app = app.sub_app_mut(RenderApp);
render_app.init_resource::<GameOfLifePipeline>();
Running the example now should produce the same screen, but still no errors. We are getting closer to actually doing something. More in part 2.
Code can be found on github: Part 1
Bevy Game of Life Shader Example Part 2
Now that we have our pipeline descriptors setup, its time to build the bind group.
A
BindGroupis a collection of resources such as buffers, textures, and samplers that are bound together and made available to shaders during rendering. Bind groups are created by the application and then bound to a specific pipeline layout, which defines the expected bindings for the resources in the group.
At the bottom of our pipeline.rs file, lets add the system which will create our bindgroup each render instance.
...

#[derive(Resource)]
struct GameOfLifeImageBindGroup(pub BindGroup);

pub fn queue_bind_group(
    mut commands: Commands,
    render_device: Res<RenderDevice>,
    pipeline: Res<GameOfLifePipeline>,
    gpu_images: Res<RenderAssets<Image>>,
    game_of_life_image: Res<GameOfLifeImage>,
) {
    let view = &gpu_images[&game_of_life_image.0];
}
Starting off we pull in RenderDevice which is used to create all wgpu resources. RenderAssets<Image> is a resource holding all the GPU representations
of RenderAssets as long as they exist. We use the handle from the image we created as our canvas, to get the GpuImage. Now the bind group:
...
let bind_group = render_device.create_bind_group(&BindGroupDescriptor {
    label: Some("Game of Life Bind Group"),
    layout: &pipeline.texture_bind_group_layout,
    entries: &[BindGroupEntry {
        binding: 0,
        resource: BindingResource::TextureView(&view.texture_view),
    }],
});
commands.insert_resource(GameOfLifeImageBindGroup(bind_group));
Well this looks really familiar! It is an exact replica of the bind_group_layout we created earlier. The only difference is that we are now adding the actual resources that the layout expects. In this case we are adding the texture view of our canvas image. Lets add the system to our render app.
...
let render_app = app.sub_app_mut(RenderApp);
        render_app
            .init_resource::<GameOfLifePipeline>()
            .add_system(pipeline::queue_bind_group.in_set(RenderSet::Queue));
We add our system to the set RenderSet::Queue which create BindGroups that depend on Prepare data and queue up draw calls to run during the Render step.
If you try running the app, it will currently crash with the following error:
Resource requested by game_of_life_sim::pipeline::queue_bind_group does not exist: game_of_life_sim::image::GameOfLifeImage
Oops! We forgot to tell bevy render world how to access our Image which exist on the main world. Let's add the ExtractResourcePlugin which just
extracts the resources into the "render world".
app.add_plugin(FrameTimeDiagnosticsPlugin::default())
    // Extract the game of life image resource from the main world into the render world
    // for operation on by the compute shader and display on the sprite.
    .add_plugin(ExtractResourcePlugin::<GameOfLifeImage>::default())
    ...
If you run again, no errors! Awesome :D. Now onto nodes and the render graph. This was new to me after I setup wgpu manually in my other projects. If you are curious,
this is the docstring attached to the RenderGraph resource:
The
RenderGraphconfigures the modular, parallel and re-usable render logic. It is a retained and stateless (nodes themselves may have their own internal state) structure, which can not be modified while it is executed by the graph runner. TheRenderGraphRunneris responsible for executing the entire graph each frame. It consists of three main components: Nodes, Edges and Slots.Nodesare responsible for generating draw calls and operating on input and output slots.Edgesspecify the order of execution for nodes and connect input and output slots together.Slotsdescribe the render resources created or used by the nodes. Additionally a render graph can contain multiple sub graphs, which are run by the corresponding nodes. Every render graph can have its own optional input node.
Essentially we setup a graph to tell the render world how to run our pipelines. We only have a single pipeline currently, so we will only need a single node.
Our node will have a state for processing which stage the shader is currently in: Loading, Init, Update. Back in pipeline.rs lets add our node:
...
pub enum GameOfLifeState {
    Loading,
    Init,
    Update,
}

pub struct GameOfLifeNode {
    state: GameOfLifeState,
}

impl Default for GameOfLifeNode {
    fn default() -> Self {
        Self {
            state: GameOfLifeState::Loading,
        }
    }
}
Lets add the node to our render app:
let render_app = app.sub_app_mut(RenderApp);
render_app
    .init_resource::<GameOfLifePipeline>()
    .add_system(pipeline::queue_bind_group.in_set(RenderSet::Queue));

let mut render_graph = render_app.world.resource_mut::<RenderGraph>();
render_graph.add_node("game_of_life", GameOfLifeNode::default());
render_graph.add_node_edge(
    "game_of_life",
    bevy::render::main_graph::node::CAMERA_DRIVER,
);
We add the node to the render graph and then add an edge to the camera driver. This will tell the render graph to run our node before the camera driver.
Our node starts in the Loading state. We now have to impl bevy's render_graph::Node: The trait is defined as follow:
pub trait Node: Downcast + Send + Sync + 'static {
    /// Specifies the required input slots for this node.
    /// They will then be available during the run method inside the [`RenderGraphContext`].
    fn input(&self) -> Vec<SlotInfo> {
        Vec::new()
    }

    /// Specifies the produced output slots for this node.
    /// They can then be passed one inside [`RenderGraphContext`] during the run method.
    fn output(&self) -> Vec<SlotInfo> {
        Vec::new()
    }

    /// Updates internal node state using the current render [`World`] prior to the run method.
    fn update(&mut self, _world: &mut World) {}

    /// Runs the graph node logic, issues draw calls, updates the output slots and
    /// optionally queues up subgraphs for execution. The graph data, input and output values are
    /// passed via the [`RenderGraphContext`].
    fn run(
        &self,
        graph: &mut RenderGraphContext,
        render_context: &mut RenderContext,
        world: &World,
    ) -> Result<(), NodeRunError>;
}
The input defines required input slots and output defines produced output slots. This will exist on the RenderGraphContext. Our example doesn't
use either, so we don't care for the graph context.
impl render_graph::Node for GameOfLifeNode {
    fn update(&mut self, world: &mut World) {
        let pipeline = world.resource::<GameOfLifePipeline>();
        let pipeline_cache = world.resource::<PipelineCache>();

        // if the corresponding pipeline has loaded, transition to the next stage
        match self.state {
            GameOfLifeState::Loading => {
                if let CachedPipelineState::Ok(_) =
                    pipeline_cache.get_compute_pipeline_state(pipeline.init_pipeline)
                {
                    self.state = GameOfLifeState::Init;
                }
            }
            GameOfLifeState::Init => {
                if let CachedPipelineState::Ok(_) =
                    pipeline_cache.get_compute_pipeline_state(pipeline.update_pipeline)
                {
                    self.state = GameOfLifeState::Update;
                }
            }
            GameOfLifeState::Update => {}
        }
    }

    fn run(
        &self,
        _graph: &mut render_graph::RenderGraphContext,
        render_context: &mut RenderContext,
        world: &World,
    ) -> Result<(), render_graph::NodeRunError> {
        Ok(())
    }
}
Lets focus on the update method. We are checking if the pipeline has loaded. If it has, we transition to the next stage. For update,
we have no other state to transition to, but if you needed to recreate your pipeline or rerun your init pipeline, you would do change the state here.
The fun stuff: run. This is where we will be running our compute shaders. Let's setup the init pipeline first:
fn run(
        &self,
        _graph: &mut render_graph::RenderGraphContext,
        render_context: &mut RenderContext,
        world: &World,
    ) -> Result<(), render_graph::NodeRunError> {
        let texture_bind_group = &world.resource::<GameOfLifeImageBindGroup>().0;
        let pipeline_cache = world.resource::<PipelineCache>();
        let pipeline = world.resource::<GameOfLifePipeline>();
        ...
We have to pull 3 resources from the world: GameOfLifeImageBindGroup, PipelineCache, and GameOfLifePipeline. We are already familiar
with the pipeline and pipeline cache, but the new resource GameOfLifeImageBindGroup is a BindGroup that we queue each frame to be used by the shader.
Now we begin the ComputePass.
...
let mut pass = render_context
    .command_encoder()
    .begin_compute_pass(&ComputePassDescriptor::default());
...
Since we are only using compute shaders, we need to begin a compute pass, the other side of the coin is a render pass for vertex and fragment shaders.
...
pass.set_bind_group(0, texture_bind_group, &[]);
...
Assign our bindgroup the the compute pass. Then we pull the state defined from our node to see which piplline to execute.
// select the pipeline based on the current state
match self.state {
    GameOfLifeState::Update | GameOfLifeState::Loading => {}
    GameOfLifeState::Init => {
        let init_pipeline = pipeline_cache
            .get_compute_pipeline(pipeline.init_pipeline)
            .unwrap();
        pass.set_pipeline(init_pipeline);
        pass.dispatch_workgroups(
            SIM_SIZE.0 / WORKGROUP_SIZE,
            SIM_SIZE.1 / WORKGROUP_SIZE,
            1,
        );
    }
}
We are skipping the update pipeline currently, but we will come back to it. For the init state, we want to run the init pipeline. We set the pipeline using our
CachedComputePipelineId defined in our GameOfLifePipeline. Then we dispatch the workgroups. The function takes 3 arguments: x, y, z. In our shader,
we defined our workgroup size as 8x8x1. @compute @workgroup_size(8, 8, 1)
A visual representation of work groups: Work Groups.
It may be helpful to think of a compute shader as a function that is run in a bunch of nested for loops, but each loop is executed in parallel. It would look something like this:
for wgx in num_workgroups.x:
    for wgy in num_workgroups.y:
        for wgz in num_workgroups.z:
            var local_invocation_id = (wgx, wgy, wgz)
            for x in workgroup_size.x:
                for y in workgroup_size.x:
                    for z in workgroup_size.x:
Running still produces the same black screen, but I promise the init pipeline triggered once, we just need to add code to our shader now! Bevy uses wgpu internally, which uses wgsl as their default shader language. They also support GLSL, but a word of warning, there can be some weird quirks when using GLSL with wgpu.
To start with our init function in our shader, we see some function inputs:
fn init(@builtin(global_invocation_id) invocation_id: vec3<u32>, @builtin(num_workgroups) num_workgroups: vec3<u32>)
This is a builtin value for the current invocation’s global invocation ID, i.e. its position in the compute shader grid. WGSL has many builtin values and functions. Please refer to the spec for more info WebGPU Shading Language.
And the num_workgroups is the number of workgroups in each dimension.
fn init(@builtin(global_invocation_id) invocation_id: vec3<u32>, @builtin(num_workgroups) num_workgroups: vec3<u32>) {
    let location = vec2<i32>(invocation_id.xy);
}
We can get the current location within the shader by casting the invocation.xy to an i32.
invocation.xy is short hand for invocation.x and invocation.y
We want to randomize our initial state, so lets define a random function.
fn hash(value: u32) -> u32 {
    var state = value;
    state = state ^ 2747636419u;
    state = state * 2654435769u;
    state = state ^ state >> 16u;
    state = state * 2654435769u;
    state = state ^ state >> 16u;
    state = state * 2654435769u;
    return state;
}

fn randomFloat(value: u32) -> f32 {
    return f32(hash(value)) / 4294967295.0;
}
There are many hash / random functions you can find online. Each with their own pros and cons. I am just using the bevy default.
2654435769u is a inline cast like in rust with 2654435769_u32. The u is for u32.
let randomNumber = randomFloat(invocation_id.y * num_workgroups.x + invocation_id.x);
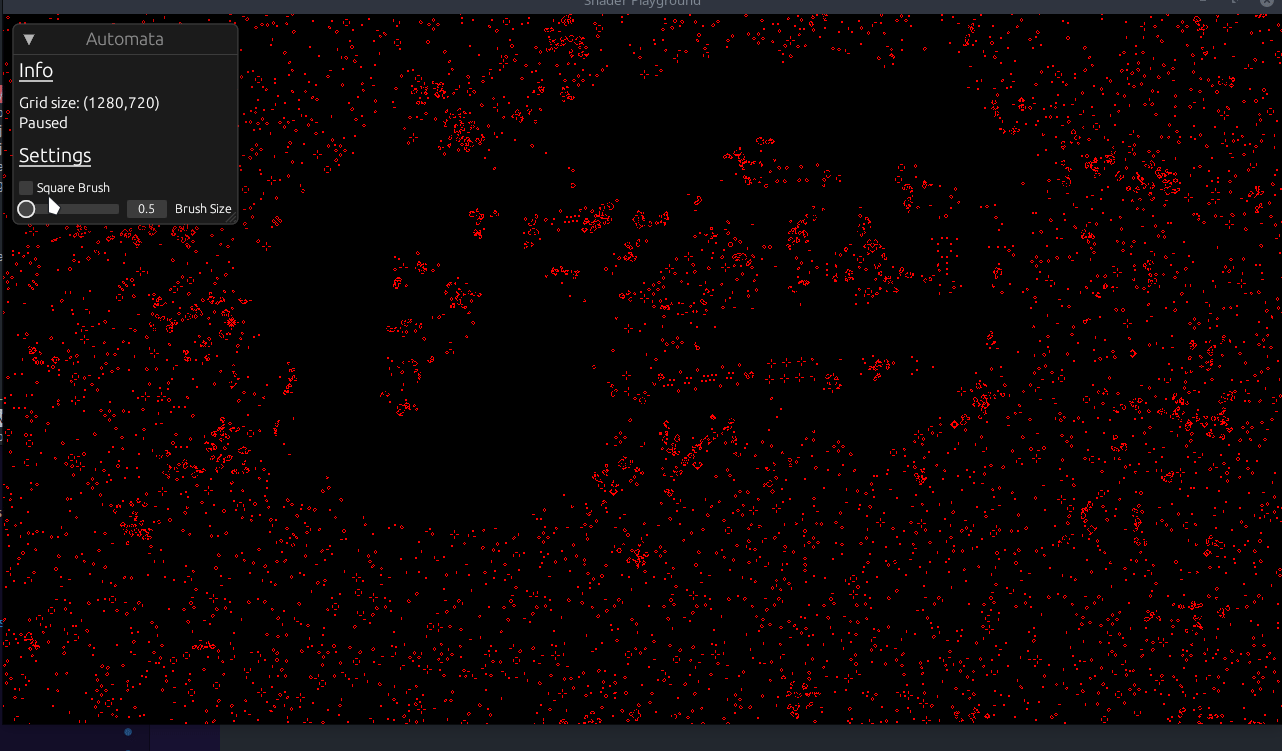
let alive = randomNumber > 0.9;
We generate a random number, and if it is greater than 0.9, we set the cell to alive. We can now set the cell in our texture. Play around with what denotes
and alive cell. Lowering 0.9 will generate more alive cells and vice versa. Lets finish off the init.
fn init(@builtin(global_invocation_id) invocation_id: vec3<u32>, @builtin(num_workgroups) num_workgroups: vec3<u32>) {
    let location = vec2<i32>(invocation_id.xy);

    let randomNumber = randomFloat(invocation_id.y * num_workgroups.x + invocation_id.x);
    let alive = randomNumber > 0.9;
    let color = vec4<f32>(f32(alive));

    textureStore(texture, location, color);
}
You might be curious what vec4<f32>(f32(alive)) is doing here. vec4<f32>() is casting the value to a vec4<f32>. We are using the f32() function to cast
the alive value from a bool to a f32. So if alive the color will be vec4<f32>(1.0) or (1.0,1.0,1.0,1.0) and if dead vec4<f32>(0.0) or (0.0,0.0,0.0,0.0).
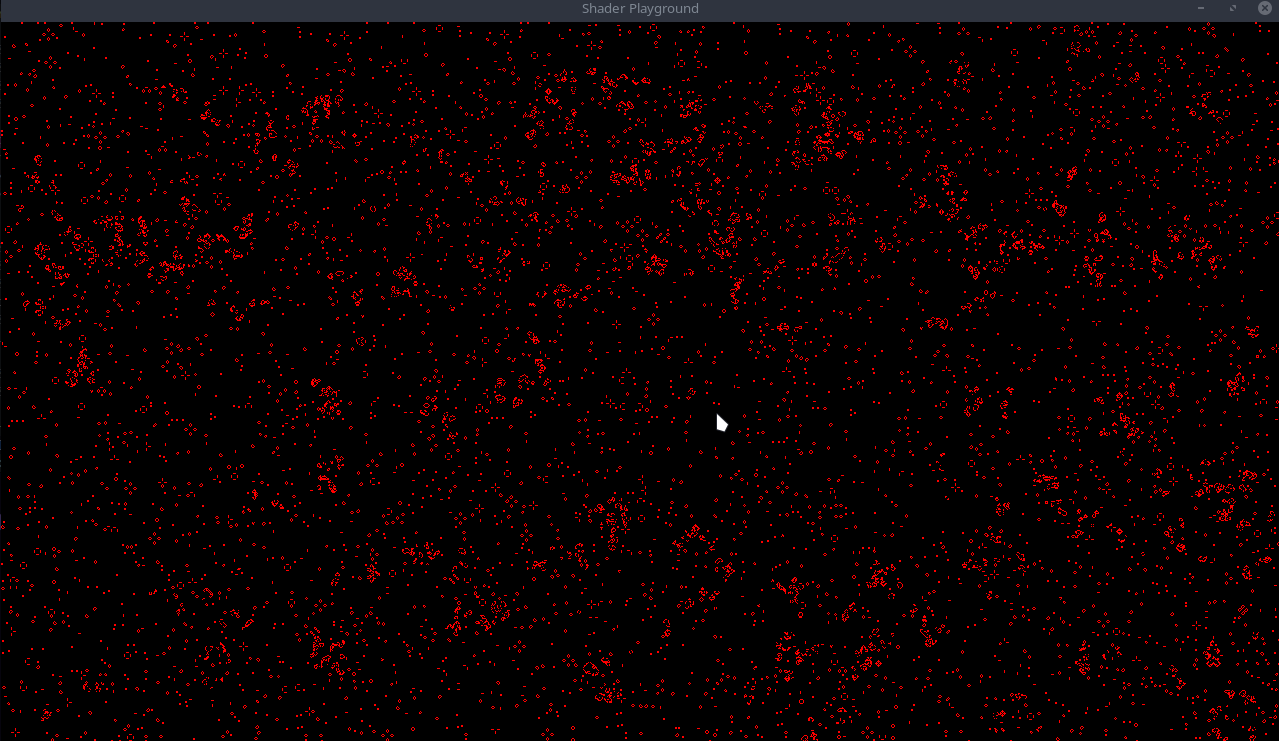
And now the moment of truth, we can run our code and see the results! Running should produce something like this:
Code can be found on github: Part 2
Bevy Game of Life Shader Example Part 3
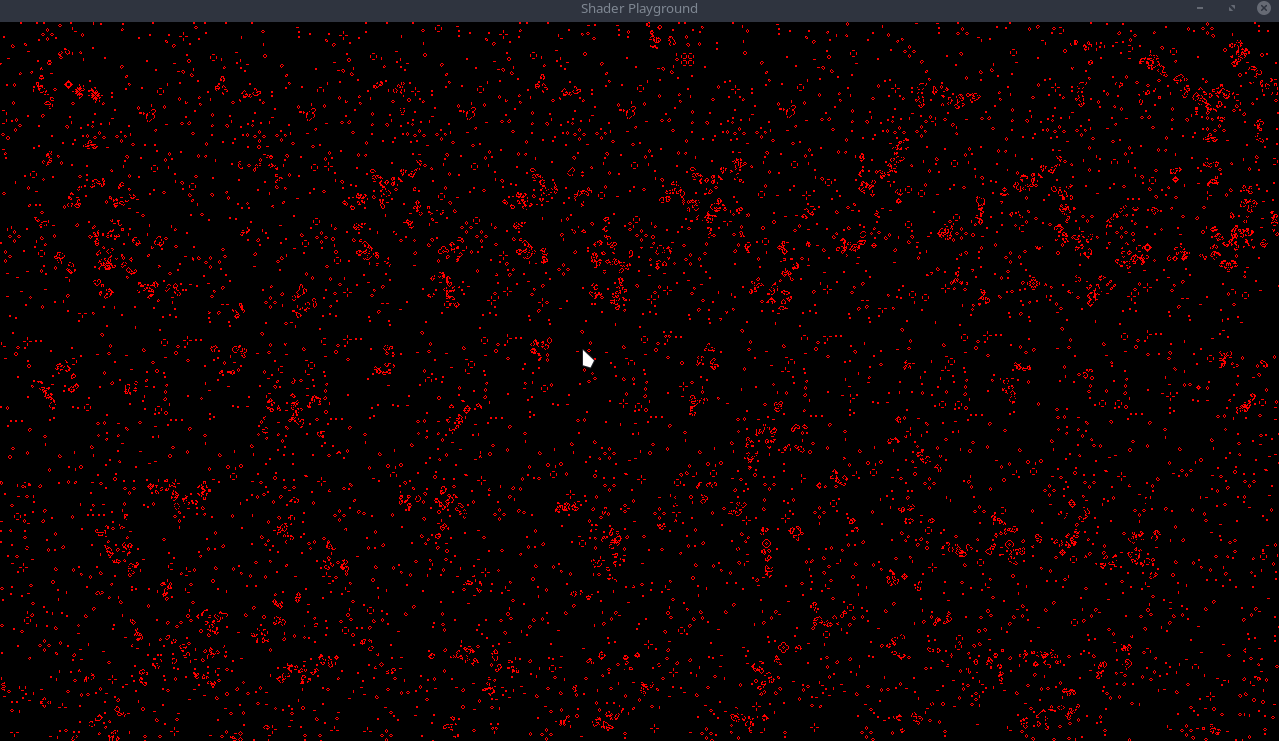
It is exciting to finally see some progress after so much boilerplate! Let's change up the color scheme a bit! I like the color red, so let's make the alive cells red. In our shader, switch the init_pipeline color to the following:
@compute @workgroup_size(8, 8, 1)
fn init(@builtin(global_invocation_id) invocation_id: vec3<u32>, @builtin(num_workgroups) num_workgroups: vec3<u32>) {
    let location = vec2<i32>(invocation_id.xy);

    let randomNumber = randomFloat(invocation_id.y * num_workgroups.x + invocation_id.x);
    let alive = randomNumber > 0.9;
    let color = vec4<f32>(f32(alive), 0.0, 0.0, 1.0); // NEW

    textureStore(texture, location, color);
}
And you should see something like this:

Very red! Now onto our update pipeline, which makes all this worth it to see the cells move.
Update Pipeline
Back in pipeline.rs lets update our match statement within the run function of our node.
// select the pipeline based on the current state
match self.state {
    GameOfLifeState::Loading => {}
    GameOfLifeState::Init => {
        let init_pipeline = pipeline_cache
            .get_compute_pipeline(pipeline.init_pipeline)
            .unwrap();
        pass.set_pipeline(init_pipeline);
        pass.dispatch_workgroups(
            SIM_SIZE.0 / WORKGROUP_SIZE,
            SIM_SIZE.1 / WORKGROUP_SIZE,
            1,
        );
    }
    GameOfLifeState::Update => {
        let update_pipeline = pipeline_cache
            .get_compute_pipeline(pipeline.update_pipeline)
            .unwrap();
        pass.set_pipeline(update_pipeline);
        pass.dispatch_workgroups(
            SIM_SIZE.0 / WORKGROUP_SIZE,
            SIM_SIZE.1 / WORKGROUP_SIZE,
            1,
        );
    }
}
It is exactly the same as the init pipeline, we just use the update pipeline instead. That takes care of the rust side of things, now onto the shader.
Conway's Game of Life
The particular bit of cellular automata we are implementing is Conway's Game of Life. The rules are as follows:
- Any live cell with fewer than two live neighbours dies, as if by underpopulation.
- Any live cell with two or three live neighbours lives on to the next generation.
- Any live cell with more than three live neighbours dies, as if by overpopulation.
- Any dead cell with exactly three live neighbours becomes a live cell, as if by reproduction.
These rules, which compare the behaviour of the automaton to real life, can be condensed into the following:
- Any live cell with two or three live neighbours survives.
- Any dead cell with three live neighbours becomes a live cell.
- All other live cells die in the next generation. Similarly, all other dead cells stay dead.
Back in our update fn, lets start by pulling the current location
@compute @workgroup_size(8, 8, 1)
fn update(@builtin(global_invocation_id) invocation_id: vec3<u32>) {
    let location = vec2<i32>(invocation_id.xy);
}
Now we need to count the number of alive neighbors, but to do that, we need a way to tell if a cell is alive or dead. Add the following utility function
...
fn is_alive(location: vec2<i32>, offset_x: i32, offset_y: i32) -> u32 {
    let value: vec4<f32> = textureLoad(texture, location + vec2<i32>(offset_x, offset_y));
    return u32(value.x);
}
...
This function takes in a location, and an offset. We store all our data within the texture itself as colors. (in our instance its red colors for alive
and black for dead). textureLoad loads the color at the given location. We know a cell is alive if the color returned is red, which is a value of 1.0 a x
Now that we have a way to tell if a cell is alive, we can move onto counting the neighbors. We need to check the 8 cells surrounding the current cell. We can achieve this using a simple nested for loop. Here is what I came up with:
fn count_neighbors_simple(location: vec2<i32>) -> u32 {
    var result: u32 = 0u;
    for (var x: i32 = -1; x < 2; x++) {
        for (var y: i32 = -1; y < 2; y++) {
            if x == 0 && y == 0 {
                continue;
            }

            result += is_alive(location, x, y);
        }
    }
    return result;
}
We take in a location to count the neighbors of, and return the number of alive neighbors by looping through the 8 surrounding cells
and calling our is_alive function. Lets add this to our update function:
@compute @workgroup_size(8, 8, 1)
fn update(@builtin(global_invocation_id) invocation_id: vec3<u32>) {
    let location = vec2<i32>(invocation_id.xy);
    let is_alive = bool(is_alive(location, 0, 0));
    let num_neighbors = count_neighbors_simple(location);
}
It is pretty staight forward from here, we just need to implement the rules from above.
...

var result: u32 = 0u;

if (is_alive) {
    result = ((u32((num_neighbors) == (2u))) | (u32((num_neighbors) == (3u))));
} else {
    result = u32((num_neighbors) == (3u));
}

let color = vec4<f32>(f32(result), 0.0, 0.0, 1.0);
textureStore(texture, location, color);
If the current cell is alive, we check if it has 2 or 3 neighbors, if it does, it lives on, otherwise it dies. If the current cell is dead, we check if it has 3 neighbors, if it does, it becomes alive, otherwise it stays dead. Then we store our result as a color in the texture (red in this case).
Note: I removed the window_fps plugin and
FrameTimeDiagnosticsPluginplugin. It was slowing down my app when running. I also disabledbevy::window::PresentMode::AutoNoVsyncotherwise, the app runs at like 3k fps XD
Running the app should now show the cells moving around!!! How cool!
Code can be found on github: Part 3
Bevy Game of Life Shader Example Part 4
I promised some additions to the original example provided so lets start with the easiest one, a simple camera controller. I just want to be able to pan around the simulation and zoom in a bit. I am going to run a cleanup and refactor for readability and cleanliness.
- Create three new files,
camera.rs,input.rs, andutils.rs, along with the a folderpipeline. It is important the pipeline folder is named exactly as thepipeline.rsfile as I am not usingmod.rsfiles. - Move the function
create_imageinto our utils folder and delete the image file. - Inside
pipelinefolder create aautomata.rsfile and move all the pipeline code from our past three posts into it. This includes thePipeline,TextureBindGroup,State, andNode.
I also renamed some things. Here is a mapping:
Pipeline->AutomataPipelineGameOfLifeImageBindGroup->AutomataTextureBindGroupGameOfLifeState->AutomataStateGameOfLifeNode->AutomataNode
Lets add a simple plugin to host from this file at the top:
#[derive(Resource, Clone, Deref, ExtractResource)]
pub struct GameOfLifeImage(pub Handle<Image>);

pub struct AutomataPipelinePlugin;
impl Plugin for AutomataPipelinePlugin {
    fn build(&self, render_app: &mut App) {
        render_app
            .init_resource::<GameOfLifeAutomataPipeline>()
            .add_system(queue_automata_bind_group.in_set(RenderSet::Queue));
    }
}
Back in the pipeline.rs file, it should be empty, so lets add another plugin to host all pipeline plugins.
pub struct PipelinesPlugin;
impl Plugin for PipelinesPlugin {
    fn build(&self, app: &mut App) {
        let render_app = app.sub_app_mut(RenderApp);
        render_app
            .add_plugin(automata::AutomataPipelinePlugin);

        let mut render_graph = render_app.world.resource_mut::<RenderGraph>();
        let gol_id = render_graph.add_node("game_of_life", automata::AutomataNode::default());

        /*
         * Automata Pipeline => Camera Driver
         */
        render_graph.add_node_edge(gol_id, bevy::render::main_graph::node::CAMERA_DRIVER);
    }
}
We are moving the render_app implementation from our ShaderPlaygroundPlugin to this new PipelinesPlugin.
Don't forget to add the PipelinesPlugin to the ShaderPlaygroundPlugin in lib.rs!
Camera
Onto setting up a camera controller.
const CAMERA_MOVE_SPEED: f32 = 500.0;

pub struct CameraPlugin;
impl Plugin for CameraPlugin {
    fn build(&self, app: &mut App) {
        app.add_system(camera_controller);
    }
}

fn camera_controller(
    time: Res<Time>,
    keyboard_input: Res<Input<KeyCode>>,
    mut mouse_wheel_events: EventReader<MouseWheel>,
    mut query: Query<(&mut Transform, &mut OrthographicProjection), With<Camera>>,
) {
    for (mut transform, mut ortho) in query.iter_mut() {
        let up = keyboard_input.pressed(KeyCode::W);
        let down = keyboard_input.pressed(KeyCode::S);
        let left = keyboard_input.pressed(KeyCode::A);
        let right = keyboard_input.pressed(KeyCode::D);

        let x_axis = right as i8 - left as i8;
        let y_axis = up as i8 - down as i8;
        let mut move_delta = Vec2::new(x_axis as f32, y_axis as f32);

        // =========== Move the camera around =========== //
        if move_delta != Vec2::ZERO {
            move_delta /= move_delta.length();

            let z = transform.translation.z;
            transform.translation +=
                move_delta.extend(z) * CAMERA_MOVE_SPEED * time.delta_seconds();

            // Important! We need to restore the Z values when moving the camera around.
            // Bevy has a specific camera setup and this can mess with how our layers are shown.
            transform.translation.z = z;
        }

        // =========== Zoom =========== //
        for MouseWheel { x, y, unit } in mouse_wheel_events.iter() {
            let mut x_scroll_diff = 0.0;
            let mut y_scroll_diff = 0.0;

            match unit {
                MouseScrollUnit::Line => {
                    x_scroll_diff += x;
                    y_scroll_diff += y;
                }
                MouseScrollUnit::Pixel => {
                    // I just took this from three-rs, no idea why this magic number was chosen ¯\_(ツ)_/¯
                    const PIXELS_PER_LINE: f32 = 38.0;

                    y_scroll_diff += y / PIXELS_PER_LINE;
                    x_scroll_diff += x / PIXELS_PER_LINE;
                }
            }

            if x_scroll_diff != 0.0 || y_scroll_diff != 0.0 {
                if y_scroll_diff < 0.0 {
                    ortho.scale *= 1.05;
                } else {
                    ortho.scale *= 1.0 / 1.05;
                }

                ortho.scale = ortho.scale.clamp(0.15, 5.);
            }
        }
    }
}
...

// in our ShaderPlaygroundPlugin

app
    // Extract the game of life image resource from the main world into the render world
    // for operation on by the compute shader and display on the sprite.
    .add_plugin(ExtractResourcePlugin::<GameOfLifeImage>::default())
    .add_plugin(camera::CameraPlugin)
    .add_startup_system(setup);
...
A simple camera controller. We generate a move delta based on the pressed keys and then using bevy's builtin time resource, manipulate the
camera's position for buttery smooth movement. Adjust the movement constant to your liking. The zoom just listens for scroll events and adjusts
the orthographic projection's scale. The MouseScrollUnit::Pixel case is taken from an online example I found. I don't know what triggers a
MouseScrollUnit::Pixel, but I have only seen Line units so far, but better safe than sorry!
To better see that our camera works well, you can replace the ClearColor(Color::BLACK) with ClearColor(Color::WHITE).
You should now be able to pan around the simulation and also zoom!
The main thing I want this part to focus on would be drawing onto our canvas. We will be using ANOTHER ;) compute pipeline to handle this for us. Lets setup the mouse positioning system that will be used.
Setting up our input bindings lets fill out input.rs file.
We need a resource to hold our mouse position, previous mouse position, and if our mouse button is down.
pub struct InputPlugin;
impl Plugin for InputPlugin {
    fn build(&self, app: &mut App) {
        app.init_resource::<AutomataParams>();
    }
}

#[derive(Default, Resource, ExtractResource, Clone)]
pub struct AutomataParams {
    pub mouse_pos: Vec2,
    pub is_drawing: bool,
    pub prev_mouse_pos: Vec2,
}

pub fn update_input_state(
    window_query: Query<&Window>,
    mut input_state: ResMut<AutomataParams>,
    camera_q: Query<(&Camera, &GlobalTransform)>,
    mut mouse_button_input_events: EventReader<MouseButtonInput>,
) {
    let Ok(primary_window) = window_query.get_single() else { return };
    // get the camera info and transform
    let Ok((camera, camera_transform)) = camera_q.get_single() else { return };

    // Determine button state
    for event in mouse_button_input_events.iter() {
        if event.button == MouseButton::Left {
            input_state.is_drawing = event.state == ButtonState::Pressed;
        }
    }
    ...
}
Mouse button is a simple event reader. The previous and current mouse position is a bit more complicated as we need to convert from world space to canvas space.
if let Some(world_position) = primary_window
    .cursor_position()
    .and_then(|cursor| camera.viewport_to_world(camera_transform, cursor))
    .map(|ray| ray.origin.truncate())
{
}
Grabbing the world_position from the window and camera is ripped from the bevy cheatbook. Now that we have the world coordinates, we need a way to transform them into curstor coordinates. In utils add a function:
use bevy::prelude::Vec2;

pub fn world_pos_to_canvas_pos(world_pos: Vec2) -> Vec2 {
    world_pos
        + Vec2::new(
            crate::SIM_SIZE.0 as f32 / 2.0,
            crate::SIM_SIZE.1 as f32 / 2.0,
        )
}
This just takes the world position and adds half the size of the canvas to it. Finish off the input system.
if let Some(world_position) = primary_window
    .cursor_position()
    .and_then(|cursor| camera.viewport_to_world(camera_transform, cursor))
    .map(|ray| ray.origin.truncate())
{
    params.prev_mouse_pos = params.mouse_pos; // NEW
    params.mouse_pos =
        crate::utils::world_pos_to_canvas_pos(world_position * Vec2::new(1.0, -1.0)); // NEW
}
world_position * Vec2::new(1.0, -1.0) is just flipping the y axis since images have y going down and wgpu has y going up.
Add the input plugin to the ShaderPlaygroundPlugin along with the ExtractResourcePlugin
...
.add_plugin(ExtractResourcePlugin::<GameOfLifeImage>::default())
.add_plugin(ExtractResourcePlugin::<AutomataParams>::default())
.add_plugin(camera::CameraPlugin)
.add_plugin(input::InputPlugin)
.add_plugin(pipeline::PipelinesPlugin)
.add_plugin(ui::UIPlugin)
.add_startup_system(setup);
Draw Pipeline
We are going to need bytemuck so add that to your project with cargo add bytemuck.
Add a new file in pipeline folder called draw. This is going to look really similar to the automata setup, just with a few minor tweaks.
pub struct AutomataDrawPipelinePlugin;
impl Plugin for AutomataDrawPipelinePlugin {
    fn build(&self, render_app: &mut App) {
        render_app
            .init_resource::<AutomataDrawPipeline>()
            .add_system(queue_draw_bind_group.in_set(RenderSet::Queue));
    }
}

// ================================== Constants ================================== //

#[repr(C)]
#[derive(Copy, Clone, bytemuck::Pod, bytemuck::Zeroable)]
pub struct AutomataPushConstants {
    draw_start: [f32; 2],
    draw_end: [f32; 2],
    draw_radius: f32,
}

impl AutomataPushConstants {
    pub fn new(draw_start: Vec2, draw_end: Vec2, draw_radius: f32) -> Self {
        Self {
            draw_radius,
            draw_end: draw_end.to_array(),
            draw_start: draw_start.to_array(),
        }
    }
}
This new struct holds our push constants that we will pass to our draw pipeline shader.
PushConstants are a way to pass data to a shader without having to create a buffer. The downside is that the data is limited and is much smaller than the limit on buffers. The upside is that it is faster than buffers.
// ================================== Pipeline ================================== //

#[derive(Resource)]
pub struct AutomataDrawPipeline {
    draw_pipeline: CachedComputePipelineId,
    draw_bind_group_layout: BindGroupLayout,
}

impl FromWorld for AutomataDrawPipeline {
    fn from_world(world: &mut World) -> Self {
        let pipeline_cache = world.resource::<PipelineCache>();

        let draw_bind_group_layout =
            world
                .resource::<RenderDevice>()
                .create_bind_group_layout(&BindGroupLayoutDescriptor {
                    label: Some("Game of Life Bind Group Layout"),
                    entries: &[BindGroupLayoutEntry {
                        binding: 0,
                        visibility: ShaderStages::COMPUTE,
                        ty: BindingType::StorageTexture {
                            access: StorageTextureAccess::ReadWrite,
                            format: TextureFormat::Rgba8Unorm,
                            view_dimension: TextureViewDimension::D2,
                        },
                        count: None,
                    }],
                });

        let brush_shader = world.resource::<AssetServer>().load("shaders/draw.wgsl");

        let draw_pipeline = pipeline_cache.queue_compute_pipeline(ComputePipelineDescriptor {
            shader: brush_shader,
            shader_defs: vec![],
            entry_point: Cow::from("draw"),
            layout: vec![draw_bind_group_layout.clone()],
            label: Some(std::borrow::Cow::Borrowed("Game of Life Draw Pipeline")),
            push_constant_ranges: [PushConstantRange {
                stages: ShaderStages::COMPUTE,
                range: 0..std::mem::size_of::<AutomataPushConstants>() as u32,
            }]
            .to_vec(),
        });

        AutomataDrawPipeline {
            draw_pipeline,
            draw_bind_group_layout,
        }
    }
}
Our draw_pipeline has a new value: push_constant_ranges. The push_constant_ranges is a range of bytes that can be passed to the shader via PushConstants.
// ================================== BindGroup ================================== //

#[derive(Resource)]
struct AutomataDrawBindGroup(pub BindGroup);

pub fn queue_draw_bind_group(
    mut commands: Commands,
    render_device: Res<RenderDevice>,
    pipeline: Res<AutomataDrawPipeline>,
    gpu_images: Res<RenderAssets<Image>>,
    game_of_life_image: Res<GameOfLifeImage>,
) {
    let view = &gpu_images[&game_of_life_image.0];
    let draw_bind_group = render_device.create_bind_group(&BindGroupDescriptor {
        label: Some("Game of Life Draw Bind Group"),
        layout: &pipeline.draw_bind_group_layout,
        entries: &[BindGroupEntry {
            binding: 0,
            resource: BindingResource::TextureView(&view.texture_view),
        }],
    });
    commands.insert_resource(AutomataDrawBindGroup(draw_bind_group));
}

// ================================== Nodes ================================== //
pub enum AutomataDrawState {
    Loading,
    Update,
}

pub struct AutomataDrawNode {
    state: AutomataDrawState,
}

impl Default for AutomataDrawNode {
    fn default() -> Self {
        Self {
            state: AutomataDrawState::Loading,
        }
    }
}
Our node only has two states: Loading and Update as we don't need to initialize anything.
impl render_graph::Node for AutomataDrawNode {
    fn update(&mut self, world: &mut World) {
        let pipeline_cache = world.resource::<PipelineCache>();
        let pipeline = world.resource::<AutomataDrawPipeline>();

        // if the corresponding pipeline has loaded, transition to the next stage
        match self.state {
            AutomataDrawState::Loading => {
                if let CachedPipelineState::Ok(_) =
                    pipeline_cache.get_compute_pipeline_state(pipeline.draw_pipeline)
                {
                    self.state = AutomataDrawState::Update;
                }
            }
            AutomataDrawState::Update => {}
        }
    }

    fn run(
        &self,
        _graph: &mut render_graph::RenderGraphContext,
        render_context: &mut RenderContext,
        world: &World,
    ) -> Result<(), render_graph::NodeRunError> {
        let params = &world.resource::<AutomataParams>();

        if params.is_drawing {
            let texture_bind_group = &world.resource::<AutomataTextureBindGroup>().0;
            let draw_bind_group = &world.resource::<AutomataDrawBindGroup>().0;
            let pipeline_cache = world.resource::<PipelineCache>();
            let pipeline = world.resource::<AutomataDrawPipeline>();

            let mut pass = render_context
                .command_encoder()
                .begin_compute_pass(&ComputePassDescriptor::default());

            pass.set_bind_group(0, texture_bind_group, &[]);

            // select the pipeline based on the current state
            match self.state {
                AutomataDrawState::Loading => {}
                AutomataDrawState::Update => {
                    let draw_pipeline = pipeline_cache
                        .get_compute_pipeline(pipeline.draw_pipeline)
                        .unwrap();

                    let pc =
                        AutomataPushConstants::new(params.mouse_pos, params.prev_mouse_pos, 10.0);

                    pass.set_pipeline(draw_pipeline);
                    pass.set_bind_group(0, draw_bind_group, &[]);
                    pass.set_push_constants(0, bytemuck::cast_slice(&[pc]));
                    pass.dispatch_workgroups(
                        SIM_SIZE.0 / WORKGROUP_SIZE,
                        SIM_SIZE.1 / WORKGROUP_SIZE,
                        1,
                    );
                }
            }
        }

        Ok(())
    }
}
Inside our run, we first check to see if we are drawing at all. If so, we pull the current mouse position as well as the previous mouse position and instantiate the AutomataPushConstants with a radius of 10.0.
We then setup the pipeline and add the push constants with bytemuck::cast_slice.
With that, our draw pipeline is complete and ready. Lets add it to our pipelines plugin:
impl Plugin for PipelinesPlugin {
    fn build(&self, app: &mut App) {
        let render_app = app.sub_app_mut(RenderApp);
        render_app
            .add_plugin(draw::AutomataDrawPipelinePlugin)
            .add_plugin(automata::AutomataPipelinePlugin);

        let mut render_graph = render_app.world.resource_mut::<RenderGraph>();
        let gol_id = render_graph.add_node("game_of_life", automata::AutomataNode::default());
        let draw_id = render_graph.add_node("game_of_life_draw", draw::AutomataDrawNode::default());
        ...
We now have a new node to use in our render graph! We want the draw_node to run before our automata_node.
let mut render_graph = render_app.world.resource_mut::<RenderGraph>();
let gol_id = render_graph.add_node("game_of_life", automata::AutomataNode::default());
let draw_id = render_graph.add_node("game_of_life_draw", draw::AutomataDrawNode::default());

/*
* Draw Pipeline => Automata Pipeline => Camera Driver
*/
render_graph.add_node_edge(draw_id, gol_id);
render_graph.add_node_edge(gol_id, bevy::render::main_graph::node::CAMERA_DRIVER);
This creates a new edge from the draw_node to the automata_node and then from the automata_node to the camera_driver! Onto the draw shader!!
Draw Shader
create a file called draw.wgsl in our shaders folder and add the following starter code:
struct PushConstants {
    draw_start: vec2<f32>,
    draw_end: vec2<f32>,
    draw_radius: f32,
}
var<push_constant> pc: PushConstants;

@group(0) @binding(0)
var texture: texture_storage_2d<rgba8unorm, read_write>;

@compute @workgroup_size(8, 8, 1)
fn draw(@builtin(global_invocation_id) invocation_id: vec3<u32>)
{
    let pixel = vec2<u32>(invocation_id.xy);
    let size = vec2<u32>(textureDimensions(texture));
    if (pixel.x >= size.x && pixel.y >= size.y) {
        return ;
    }

    // Draw circle
    if (pc.draw_radius > 0.0) {

    }
}
This is all familiar except for the new push_contant and a new function: textureDimensions. The push_contant variable should match what we are passing from
rust side of things. We are passing in the start and end of the mouse position as well as the radius of the circle we want to draw.
textureDimensions function returns the dimensions of the texture we are sampling from.We use this to check if the current pixel is outside of the texture
bounds.
Now we pass in a start and end position, so we need to generate a line between these two points. Searching the web I found the following stackoverflow
thread with many examples: shortest-distance-between-a-point-and-a-line-segment
// Line v->w, point p
// https://stackoverflow.com/questions/849211/shortest-distance-between-a-point-and-a-line-segment
fn closest_point_on_line(v: vec2<f32>, w: vec2<f32>, p: vec2<f32>) -> vec2<f32> {
    let c = v - w;

    // length squared
    let l2 = dot(c, c);
    if (l2 == 0.0) {
        return v;
    }

    let t = max(0.0, min(1.0, dot(p - v, w - v) / l2));
    let projection = v + t * (w - v);
    return projection;
}
Challenge: Feel free to scower the web for your own implementation and try replacing my implementation with yours!
Using this in our draw function:
// Draw circle
    if (pc.draw_radius > 0.0) {
        let pos = vec2<f32>(pixel);
        let point_on_line = closest_point_on_line(pc.draw_start, pc.draw_end, pos);
    }
We need to cast our pixel variable to an f32 to be used by our closest_point_on_line function. We can now use this point to draw with. Add a new function
for drawing a circle:
fn draw_particle_circle(pos: vec2<f32>, draw_pos: vec2<f32>, radius: f32) {
    let y_start = draw_pos.y - radius;
    let y_end = draw_pos.y + radius;
    let x_start = draw_pos.x - radius;
    let x_end = draw_pos.x + radius;
    if (pos.x >= x_start && pos.x <= x_end && pos.y >= y_start && pos.y <= y_end) {
        let diff = pos - draw_pos;
        let dist = length(diff);
        if (round(dist) <= radius) {
            textureStore(texture, vec2<i32>(pos), vec4<f32>(1.0, 1.0, 1.0, 1.0));
        }
    }
}
This looks pretty similar to how you would draw a circle on the rust side. We create a bounding box based on the radius and make sure our click position falls within that box. If it does, we calculate the distance from the click position to the current pixel and if that distance is less than or equal to the radius, we store an alive cell at that position. (remember our alive cells are marked by a 1.0 value in the r channel of the pixel color).
Finish off our shader:
// Draw circle
if (pc.draw_radius > 0.0) {
    let pos = vec2<f32>(pixel);
    let point_on_line = closest_point_on_line(pc.draw_start, pc.draw_end, pos);
    draw_particle_circle(pos, point_on_line, pc.draw_radius);
}
Complete
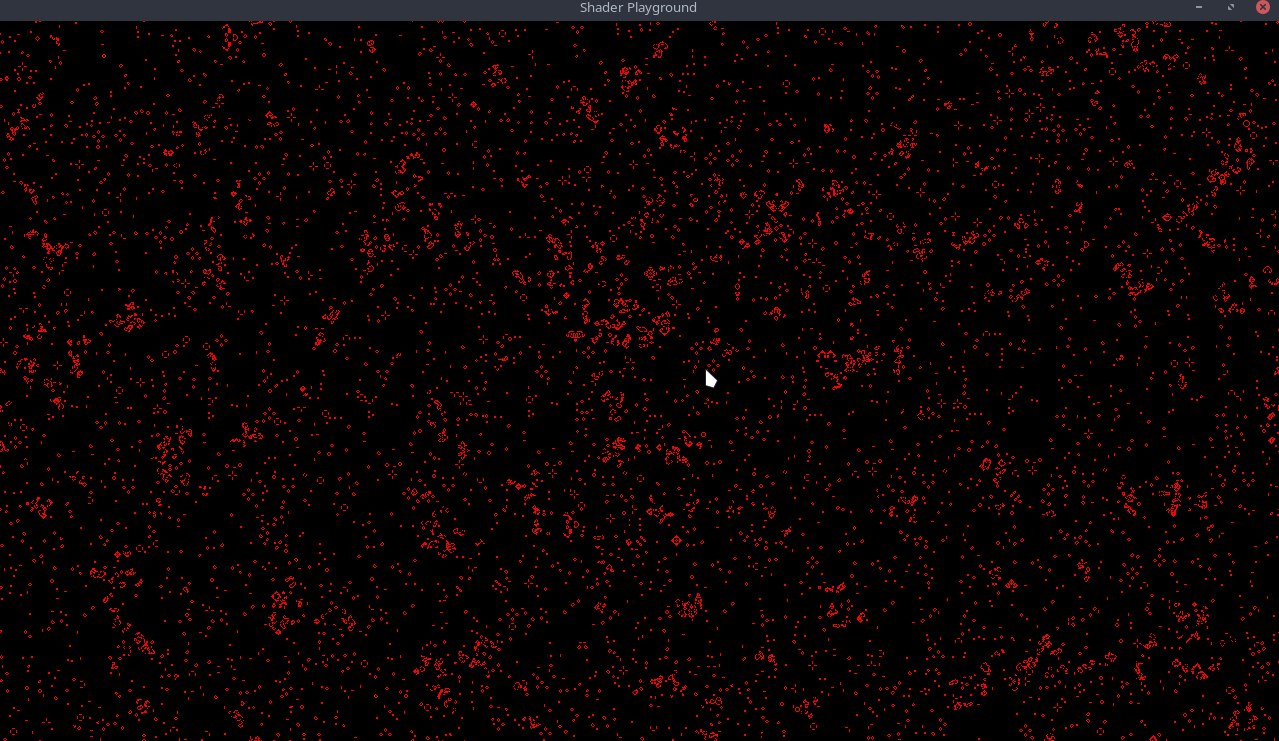
Running the example you should be able to draw on the simulation with your mouse:
Bonus
One thing you might notice is our simulation doesn't wrap between the edges. We can fix this by manipulating our game_of_life.wgsl slightly.
In the is_alive function we can add the following:
fn is_alive(location: vec2<i32>, offset_x: i32, offset_y: i32) -> u32 {
    let size = vec2<i32>(textureDimensions(texture));
    var loc = ((location + vec2<i32>(offset_x, offset_y)) + size) % size;
    let value: vec4<f32> = textureLoad(texture, loc);
    return u32(value.x);
}
I broke out the calculations onto multiple lines for readability. We first get the dimensions of the texture we are sampling from. We then add the offset to the current location, add the size to that result and finally mod the result by the size. This will wrap the edges of the texture both x and y.
With that, our cells will now wrap around the edges of the simulation! Awesome!
Challenge: Create a method to draw a square instead of a circle. For even more complexity, you can add a push_constant bool to pass in whether you want to draw a circle or a square.
Code can be found on github: Part 4
Bevy Game of Life Shader Example Part 5
Square Challenge
Spoiler warning
In the past tutorial, I challenged you to draw a square instead of a circle. Let's see how your implementation compares to mine.
fn draw_particle_square(pos: vec2<f32>, draw_pos: vec2<f32>, size: f32)  {
    let y_start = draw_pos.y - size / 2.;
    let y_end = draw_pos.y + size / 2.;
    let x_start = draw_pos.x - size / 2.;
    let x_end = draw_pos.x + size / 2.;
    if (pos.x >= x_start && pos.x <= x_end && pos.y >= y_start && pos.y <= y_end) {
        textureStore(texture, vec2<i32>(pos), vec4<f32>(1.0, 1.0, 1.0, 1.0));
    }
}
Quick Renames
If you previous completed part_4, I changed InputState => AutomataParams.
UI
Before we continue with the graphical side of things, let's add some UI to our game. I prefer to use egui in my projects, and there is a wonderful integration crate for bevy bevy_egui. Let's add it to our project.
$
cargo add bevy_egui
Our UI will be pretty simplicstic for now. We will show the base simulation properties, and a couple of overridable properties. We are going to quickly add some new properties that we will use.
pub struct AutomataParams {
    pub is_paused: bool, // NEW
    pub is_drawing: bool,
    pub can_scroll: bool, // NEW
    pub use_square_brush: bool, // NEW

    pub radius: f32, // NEW
    pub mouse_pos: Vec2,
    pub prev_mouse_pos: Vec2,
}

impl Default for AutomataParams {
    fn default() -> Self {
        Self {
            is_paused: false, // NEW
            can_scroll: true, // NEW
            is_drawing: false,
            use_square_brush: true, // NEW

            radius: 4.0, // NEW
            mouse_pos: Vec2::ZERO,
            prev_mouse_pos: Vec2::ZERO,
        }
    }
}
Now lets build our UI!
const SPACING: f32 = 10.0;
const TEXT_SIZE: f32 = 15.0;
const HEADING_SIZE: f32 = 20.0;

#[bevy_plugin]
pub fn UIPlugin(app: &mut App) {
    app.add_plugin(EguiPlugin).add_system(user_interface); // Remember to add the EguiPlugin
}

/// Give our text a custom size
fn sized_text(ui: &mut Ui, text: impl Into<String>) {
    ui.label(
        egui::RichText::new(text)
            .size(TEXT_SIZE)
            .color(egui::Color32::WHITE),
    );
}

fn heading(ui: &mut Ui, text: impl Into<String>) {
    ui.heading(
        egui::RichText::new(text)
            .underline()
            .size(HEADING_SIZE)
            .color(egui::Color32::WHITE),
    );
}
I am adding a couple of helper methods just to make things easier and reduce the boilerplate I have to write later :D
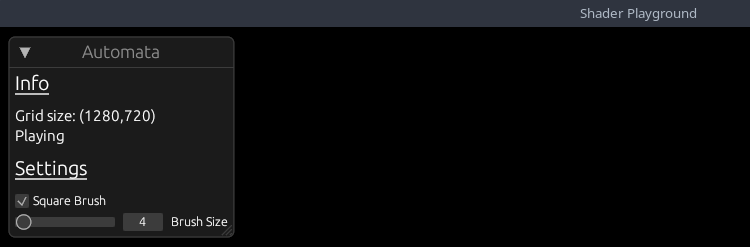
/// System to generate user interface with egui
pub fn user_interface(
    mut contexts: EguiContexts,
    mut params: ResMut<AutomataParams>,
) {
    egui::Window::new("Automata")
        .constrain(true)
        .fixed_pos(egui::pos2(10.0, 10.0))
        .show(contexts.ctx_mut(), |ui| {
            ui.visuals_mut().override_text_color = Some(egui::Color32::WHITE);

            heading(ui, "Info");
            ui.add_space(SPACING);

            sized_text(ui, format!("Grid size: ({},{})", SIM_SIZE.0, SIM_SIZE.1));

            sized_text(
                ui,
                (if params.is_paused {
                    "Paused"
                } else {
                    "Simulating"
                })
                .to_string(),
            );

            ui.add_space(SPACING);
            heading(ui, "Settings");
            ui.add_space(SPACING);

            ui.checkbox(&mut params.use_square_brush, "Square Brush");
            ui.add(egui::Slider::new(&mut params.radius, 1.0..=200.0).text("Brush Size"));
        });
}
Our Info section will show the size of our grid, and if our simulation is currently running. The Settings section will
allow us to change the brush size and toggle between a square brush or circular brush.
Add the plugin to our main plugin, and run the application. This is how it looks:
Let's hookup these properties to our application so we can actually use them!!
In our update_input_state system, we need to check if Egui is currently being hovered, or capturing the mouse. If so, we need to disable certain inputs
from happening while the UI is active.
pub fn update_input_state(
    mut contexts: EguiContexts,
    window_query: Query<&Window>,
    mut params: ResMut<AutomataParams>,
    keyboard_input: Res<Input<KeyCode>>,
    camera_q: Query<(&Camera, &GlobalTransform)>,
    mut mouse_button_input_events: EventReader<MouseButtonInput>,
) {
    let Ok(primary_window) = window_query.get_single() else { return };
    // get the camera info and transform
    let Ok((camera, camera_transform)) = camera_q.get_single() else { return };

    let ctx = contexts.ctx_mut();
    if ctx.wants_pointer_input()
        || ctx.is_pointer_over_area()
        || ctx.is_using_pointer()
        || ctx.wants_pointer_input()
    {
        // GUI gets priority input
        params.is_drawing = false;
        params.can_scroll = false;
        return;
    } else {
        params.can_scroll = true;
    }
...
Essentiall, if the UI is currently using the mouse, we don't want to allow the user to draw on the grid, or scroll the camera.
Now we can hookup our is_paused property to our simulation. We will do this in the update_simulation system.
...
// Pause the simulation
if keyboard_input.just_pressed(KeyCode::Space) {
    params.is_paused = !params.is_paused;
}
...
Feel free to use whatever KeyCode you wish, but we just flip the simulation run state when the user presses the spacebar.
Quickly flipping to our camera_controller system, we can disable scroll events based on our new property.
pub fn camera_controller(
    time: Res<Time>,
    params: Res<AutomataParams>, // NEW
    keyboard_input: Res<Input<KeyCode>>,
    mut mouse_wheel_events: EventReader<MouseWheel>,
    mut query: Query<(&mut Transform, &mut OrthographicProjection), With<Camera>>,
)
...
// =========== Zoom =========== //
if params.can_scroll { // NEW
    // zoom code
}
In our automata pipeline, we can disable the pipeline if the simulation is paused.
fn run(
    &self,
    _graph: &mut render_graph::RenderGraphContext,
    render_context: &mut RenderContext,
    world: &World,
) -> Result<(), render_graph::NodeRunError> {
    let is_paused = &world.resource::<AutomataParams>().is_paused;

    if !is_paused {
        // run the init / update pipelines
    }

    Ok(())
}
And finally, we can use the two new params in our AutomataPushConstants for our draw_pipeline.
pub struct AutomataPushConstants {
    draw_start: [f32; 2],
    draw_end: [f32; 2],
    draw_radius: f32,
    draw_square: u32, // NEW
}

impl AutomataPushConstants {
    pub fn new(draw_start: Vec2, draw_end: Vec2, draw_radius: f32, draw_square: bool) -> Self {
        Self {
            draw_radius,
            draw_end: draw_end.to_array(),
            draw_square: draw_square as u32,  // NEW
            draw_start: draw_start.to_array(),
        }
    }
}

...

let pc = AutomataPushConstants::new(
    params.mouse_pos,
    params.prev_mouse_pos,
    params.radius, // NEW
    params.use_square_brush, // NEW
);
...
Currently, there is no bool type for push_constants so a u32 will have to do.
To finish up our integrations, we need to fix our draw.wgsl to use the new draw_square property.
struct PushConstants {
    draw_start: vec2<f32>,
    draw_end: vec2<f32>,
    draw_radius: f32,
    draw_square: u32,
}
var<push_constant> pc: PushConstants;

...

fn draw_particle_square(pos: vec2<f32>, draw_pos: vec2<f32>, size: f32)  {
    let y_start = draw_pos.y - size / 2.;
    let y_end = draw_pos.y + size / 2.;
    let x_start = draw_pos.x - size / 2.;
    let x_end = draw_pos.x + size / 2.;
    if (pos.x >= x_start && pos.x <= x_end && pos.y >= y_start && pos.y <= y_end) {
        aliveDts[idx(vec2<i32>(pos))] = new_cell(true);
    }
}

if (pc.draw_radius > 0.0) {
    let pos = vec2<f32>(pixel);
    let point_on_line = closest_point_on_line(pc.draw_start, pc.draw_end, pos);

    // NEW BLOCK
    if (bool(pc.draw_square)){
        draw_particle_square(pos, point_on_line, pc.draw_radius);
    }else{
        draw_particle_circle(pos, point_on_line, pc.draw_radius);
    }
}
Running our simulation now: We can see the UI is working as expected! We can change the radius, and even pause the simulation with Space.
Whew that was alot, but we have a working UI now! I now want to explore another feature of wgpu, buffers. Currently, we have been storing
all of our cell data as colors in our texture, but what if we wanted to store more data? We could use different values within the color channels,
but that would get messy quickly and would also be hard to track, instead we are going to store our cells in buffers and use the buffers to
paint to the texture.
Buffers
A buffer is a blob of data on the GPU. A buffer is guaranteed to be contiguous, meaning that all the data is stored sequentially in memory. Buffers are generally used to store simple things like structs or arrays, but they can store more complex stuff such as graph structures like trees (provided all the nodes are stored together and don't reference anything outside of the buffer)
To get started, we are going to add a Uniform buffer for our simulation size, instead of querying the texture each time. This is a pretty simplicstic
example for a uniform buffer, but it will help us understand the basics.
Uniform Buffers
A uniform is a blob of data that is available to every invocation of a set of shaders. We've technically already used uniforms for our texture and sampler. Uniform buffers are great for small, read only data
Add a helper method to our utils.rs file:
pub fn create_uniform_buffer<T: bytemuck::Pod + bytemuck::Zeroable>(
    device: &RenderDevice,
    data: &[T],
    label: Option<&str>,
) -> Buffer {
    device.create_buffer_with_data(&BufferInitDescriptor {
        label,
        contents: bytemuck::cast_slice(data),
        usage: BufferUsages::UNIFORM | BufferUsages::COPY_DST,
    })
}
We using our handy dandy RenderDevice to create a buffer with initial data. The contents has to be &[u8] so we use bytemuck to cast our data to bytes.
Notice the buffer usage. UNIFORM because this will be a uniform buffer and COPY_DST allows a buffer to be the destination buffer for
a CommandEncoder::copy_buffer_to_buffer, CommandEncoder::copy_texture_to_buffer, CommandEncoder::clear_buffer or Queue::write_buffer operation.
Over in our setup system where we create our image, lets also add our buffers.
// NEW
#[derive(Resource, Clone, ExtractResource)]
pub struct GameOfLifeBuffers {
    pub uniform_buffer: Buffer,
}

fn setup(mut commands: Commands, mut images: ResMut<Assets<Image>>, device: Res<RenderDevice>) {
    ...
    let uniform_size_buffer = utils::create_uniform_buffer(
        &device,
        &[SIM_SIZE.0, SIM_SIZE.1],
        Some("Simulation Size Uniform"),
    );

    commands.spawn(Camera2dBundle::default());
    commands.insert_resource(GameOfLifeImage(image));

    // NEW
    commands.insert_resource(GameOfLifeBuffers {
        uniform_buffer: uniform_size_buffer,
    });
}
Using our helper method, we create a buffer with two u32 values: sim_width and sim_height and insert it into our resources.
As previously where we had to tell our pipeline about the entire layout, we need to add the uniform buffer description as well.
Remember to add the ExtractResourcePlugin to the main plugin:
.add_plugin(ExtractResourcePlugin::<GameOfLifeBuffers>::default())Starting with AutomataPipeline in the FromWorld implementation:
.create_bind_group_layout(&BindGroupLayoutDescriptor {
    label: Some("Game of Life Bind Group Layout"),
    entries: &[
        BindGroupLayoutEntry {
            binding: 0,
            count: None,
            visibility: ShaderStages::COMPUTE,
            ty: BindingType::Buffer {
                ty: BufferBindingType::Uniform,
                has_dynamic_offset: false,
                min_binding_size: BufferSize::new(
                    (2 * std::mem::size_of::<u32>()) as _,
                ),
            },
        },
        BindGroupLayoutEntry {
            binding: 1,
            visibility: ShaderStages::COMPUTE,
            ty: BindingType::StorageTexture {
                access: StorageTextureAccess::ReadWrite,
                format: TextureFormat::Rgba8Unorm,
                view_dimension: TextureViewDimension::D2,
            },
            count: None,
        },
    ],
});
We are setting our uniform buffer as the first binding, this is important because changing our layout will have to also be reflected in the BindGroup and
related shader. The entry type is BufferBindingType::Uniform and we set the min_binding_size to the size of 2 u32 values.
Then in our bind_group creation:
let bind_group = render_device.create_bind_group(&BindGroupDescriptor {
    label: Some("Game of Life Bind Group"),
    layout: &pipeline.texture_bind_group_layout,
    entries: &[
        BindGroupEntry {
            binding: 0,
            resource: buffers.uniform_buffer.as_entire_binding(),
        },
        BindGroupEntry {
            binding: 1,
            resource: BindingResource::TextureView(&view.texture_view),
        },
    ],
});
Finally we can modify our shader to intake this new layout:
// game_of_life.wgsl

@group(0) @binding(0)
var<uniform> size : vec2<u32>; // width, height
@group(0) @binding(1)
var texture: texture_storage_2d<rgba8unorm, read_write>;

...

fn is_alive(location: vec2<i32>, offset_x: i32, offset_y: i32) -> u32 {
    var loc = ((location + vec2<i32>(offset_x, offset_y)) + vec2<i32>(size)) % vec2<i32>(size);
    let value: vec4<f32> = textureLoad(texture, loc);
    return u32(value.x);
}
Our uniform is a vec2<u32>, for width/height, and we can now replaced our previous calls with textureDimensions with size.
Challenge: Can you add the uniform buffer to the draw pipeline and use it within the shader?
Challenge Spoiler
Adding the uniform to the draw pipeline is exactly the same as the compute pipeline. This is the resulting shader code from the buffer:
@compute @workgroup_size(8, 8, 1)
fn draw(@builtin(global_invocation_id) invocation_id: vec3<u32>)
{
    let pixel = vec2<u32>(invocation_id.xy);
    if (pixel.x >= size.x && pixel.y >= size.y) { // NEW
        return ;
    }

    if (pc.draw_radius > 0.0) {
        let pos = vec2<f32>(pixel);
        let point_on_line = closest_point_on_line(pc.draw_start, pc.draw_end, pos);

        if (bool(pc.draw_square)){
            draw_particle_square(pos, point_on_line, pc.draw_radius);
        }else{
            draw_particle_circle(pos, point_on_line, pc.draw_radius);
        }
    }
}
Review the source for the full implementation.
Storage Buffers
Storage buffers are usually slightly slower than uniform buffers, but they can be much, much bigger. They can be read or written to. They are useful for storing large amounts of data that is read or written to by shaders.
We are going to use StorageBuffers to store our cell data. Now before we start creating and hooking up our storage buffer, I want to explain the reasoning
for switching to a storage buffer. Previously we were using a Texture2d to store our cell data. This was great for single value fields, but I want
to store more data per cell, specifically, I want to allow for the simulation to have a heat map based on cell state.\
sturct Cell{
    alive: u32,
    heat: f32,
}
This will be the struct inside our shader, so lets keep that in mind when creating the buffers. Let's add another helper method to our utils module:
pub fn create_storage_buffer_with_data<T: bytemuck::Pod + bytemuck::Zeroable>(
    device: &RenderDevice,
    data: &[T],
    label: Option<&str>,
) -> Buffer {
    device.create_buffer_with_data(&BufferInitDescriptor {
        label,
        contents: bytemuck::cast_slice(data),
        usage: BufferUsages::STORAGE | BufferUsages::COPY_DST,
    })
}
Same as our uniform buffer, but this time we are using BufferUsages::STORAGE.
Then in our setup:
#[derive(Resource, Clone, ExtractResource)]
pub struct GameOfLifeBuffers {
    pub uniform_buffer: Buffer,
    pub in_out_buffers: Vec<Buffer>, // NEW
}

...

// We multiply by 2 because we need to store `alive` and `heat` data for each cell.
let initial_life_data = vec![0u32; 2 * NUM_OF_CELLS];
let buffers = (0..2)
    .map(|i| {
        utils::create_storage_buffer_with_data(
            &device,
            &initial_life_data,
            Some(&format!("Game of Life Buffer {i}")),
        )
    })
    .collect::<Vec<_>>();

commands.spawn(Camera2dBundle::default());
commands.insert_resource(GameOfLifeImage(image));
commands.insert_resource(GameOfLifeBuffers {
    in_out_buffers: buffers, // NEW!!
    uniform_buffer: uniform_size_buffer,
});
First thing you probably notice is that we are adding two buffers. The reason for this is we are going to use the ping-pong technique to swap between
buffers. This is a common technique used in graphics programming. We will be using one buffer to read from and one buffer to write to. Then we will
swap the buffers and repeat.
You can determine the state of each cell by its neighbors, then write the new state to an output buffer, and repeat each frame swapping the output buffer to be the new input. Each pixel calculation can be done independently of each other despite the neighbor relations. Or a fractal. These are what you'd call embarrassingly parallel. We want that.
- Read Buffer Input
- Determine new state
- Write Buffer Output
- Swap Buffer Input and Buffer Output Repeat
To flip the input buffer with the ouput buffer, we are going to keep track of a simple frame counter and just modulo it by 2.
pub struct AutomataParams {
    pub is_paused: bool,
    pub is_drawing: bool,
    pub can_scroll: bool,
    pub use_square_brush: bool,

    pub radius: f32,
    pub mouse_pos: Vec2,
    pub prev_mouse_pos: Vec2,
    pub frame: Arc<Mutex<usize>>, /// NEW
}
Now why an Arc<Mutex>? Because our AutomataParams exist within the main world, and are copied into the render world each frame, we have no way to get
changes back to the main world, if we manipulated the frame directly. So we are going to use an Arc<Mutex> to share the frame counter between the
main world and the render world.
Then again starting with our AutomataPipeline:
...

const NUM_OF_CELLS: usize = (SIM_SIZE.0 * SIM_SIZE.1) as usize;

...

.create_bind_group_layout(&BindGroupLayoutDescriptor {
    label: Some("Game of Life Bind Group Layout"),
    entries: &[
        BindGroupLayoutEntry {
            binding: 0,
            count: None,
            visibility: ShaderStages::COMPUTE,
            ty: BindingType::Buffer {
                ty: BufferBindingType::Uniform,
                has_dynamic_offset: false,
                min_binding_size: BufferSize::new(
                    (2 * std::mem::size_of::<u32>()) as _,
                ),
            },
        },
        BindGroupLayoutEntry { // NEW
            binding: 1,
            count: None,
            visibility: ShaderStages::COMPUTE,
            ty: BindingType::Buffer {
                ty: BufferBindingType::Storage { read_only: false },
                has_dynamic_offset: false,
                min_binding_size: BufferSize::new(
                    (2 * NUM_OF_CELLS * std::mem::size_of::<u32>()) as _,
                ),
            },
        },
        BindGroupLayoutEntry { // NEW
            binding: 2,
            count: None,
            visibility: ShaderStages::COMPUTE,
            ty: BindingType::Buffer {
                ty: BufferBindingType::Storage { read_only: false },
                has_dynamic_offset: false,
                min_binding_size: BufferSize::new(
                    (2 * NUM_OF_CELLS * std::mem::size_of::<u32>()) as _,
                ),
            },
        },
        BindGroupLayoutEntry {
            binding: 3,
            visibility: ShaderStages::COMPUTE,
            ty: BindingType::StorageTexture {
                access: StorageTextureAccess::ReadWrite,
                format: TextureFormat::Rgba8Unorm,
                view_dimension: TextureViewDimension::D2,
            },
            count: None,
        },
    ],
});

...


pub fn queue_automata_bind_group(
    mut commands: Commands,
    render_device: Res<RenderDevice>,

    params: Res<AutomataParams>,
    buffers: Res<GameOfLifeBuffers>,
    game_of_life_image: Res<GameOfLifeImage>,

    pipeline: Res<AutomataPipeline>,
    gpu_images: Res<RenderAssets<Image>>,
) {
    let view = &gpu_images[&game_of_life_image.0];

    // NEW!!!
    let (buffer_src, buffer_dst) = if *params.frame.lock() % 2 == 0 {
        (&buffers.in_out_buffers[0], &buffers.in_out_buffers[1])
    } else {
        (&buffers.in_out_buffers[1], &buffers.in_out_buffers[0])
    };

    let bind_group = render_device.create_bind_group(&BindGroupDescriptor {
        label: Some("Game of Life Bind Group"),
        layout: &pipeline.texture_bind_group_layout,
        entries: &[
            BindGroupEntry {
                binding: 0,
                resource: buffers.uniform_buffer.as_entire_binding(),
            },
            BindGroupEntry {
                binding: 1,
                resource: buffer_src.as_entire_binding(), // NEW
            },
            BindGroupEntry {
                binding: 2,
                resource: buffer_dst.as_entire_binding(), // NEW
            },
            BindGroupEntry {
                binding: 3,
                resource: BindingResource::TextureView(&view.texture_view),
            },
        ],
    });
...
Our storage type is read_only: false because we are going to be writing to it and our min_binding_size is the size of 2 u32 multiplied by
the number of cells. We use the frame property to swap the buffers each frame so that our input buffer becomes out output buffer and vice versa.
Now in our AutomataNode implementation, let's update the update fn to update the frame each time:
fn update(&mut self, world: &mut World) {
    let pipeline = world.resource::<AutomataPipeline>();
    let pipeline_cache = world.resource::<PipelineCache>();

    // if the corresponding pipeline has loaded, transition to the next stage
    match self.state {
        AutomataState::Loading => {
            if let CachedPipelineState::Ok(_) =
                pipeline_cache.get_compute_pipeline_state(pipeline.init_pipeline)
            {
                self.state = AutomataState::Init;
            }
        }
        AutomataState::Init => {
            if let CachedPipelineState::Ok(_) =
                pipeline_cache.get_compute_pipeline_state(pipeline.update_pipeline)
            {
                self.state = AutomataState::Update;
            }
        }
        AutomataState::Update => {
            // NEW!!
            let params = world.resource_mut::<AutomataParams>();
            if !params.is_paused {
                *params.frame.lock() += 1;
            }
        }
    }
}
Our shaders are going to start sharing similar properties, so lets create a core shader module to be imported into our main shaders:
Create a top level folder call shaders and add a file called core.wgsl.
#define_import_path bevy_shader_playground::core

struct Cell{
    alive: u32,
    heat: u32,
};

struct PushConstants {
    draw_start: vec2<f32>,
    draw_end: vec2<f32>,
    draw_radius: f32,
    draw_square: u32,
}
var<push_constant> pc: PushConstants;

fn idx(location: vec2<i32>) -> i32 {
    return location.y * i32(size.x) + location.x;
}

fn new_cell(alive: bool) -> Cell {
    return Cell(u32(alive), 0u);
}
We are moving our push_constants struct into this module and adding a new struct called Cell which will be used to represent our cells in our buffers.
We are also adding a couple helper functions. The idx function will be used to convert our 2d coordinates into a 1d index since our buffers are 1d arrays.
The new_cell helps generate new Cells with a zero heat value.
WebGPU doesn't have the concept of importing other shaders, so this is a bevy specfiic feature. So we need to register our internal shader, so that bevy
knows how to handle our import maps. In our pipeline.rs file inside our plugin:
pub const SHADER_CORE: HandleUntyped =
    HandleUntyped::weak_from_u64(Shader::TYPE_UUID, 1371231089456109822);

pub struct PipelinesPlugin;
impl Plugin for PipelinesPlugin {
    fn build(&self, app: &mut App) {
        load_internal_asset!(app, SHADER_CORE, "shaders/core.wgsl", Shader::from_wgsl);
...
Here we are registering our core shader so that we can import it in our main shaders! That wraps up the rust porting,
now in our game_of_life.wgsl lets add the new layout.
#import bevy_shader_playground::core

@group(0) @binding(0)
var<uniform> size : vec2<u32>; // width, height
@group(0) @binding(1)
var<storage, read_write> aliveSrc : array<Cell>;
@group(0) @binding(2)
var<storage, read_write> aliveDts : array<Cell>;
@group(0) @binding(3)
var texture: texture_storage_2d<rgba8unorm, read_write>;

fn get_cell(location: vec2<i32>) -> Cell {
    return aliveSrc[idx(location)];
}

...
We import our core module to get access to the Cell struct. We are adding two new read_write (this matches the bindings!) buffers of Cell.
I added a get_cell helper function just to cut down on boilerplate a bit. To fix our init function, we just need to replace the textureStore call
with inserting a new cell into our aliveSrc buffer:
@compute @workgroup_size(8, 8, 1)
fn init(@builtin(global_invocation_id) invocation_id: vec3<u32>, @builtin(num_workgroups) num_workgroups: vec3<u32>) {
    let location = vec2<i32>(invocation_id.xy);

    let randomNumber = randomFloat(invocation_id.y * num_workgroups.x + invocation_id.x);
    let alive = randomNumber > 0.9;
    aliveSrc[idx(location)] = new_cell(alive); // NEW!!
}
Pretty simple! It works just like a normal Vec does in rust with indexing. Let's also update the is_alive function to use our new get_cell helper:
fn is_alive(location: vec2<i32>, offset_x: i32, offset_y: i32) -> u32 {
    var loc = ((location + vec2<i32>(offset_x, offset_y)) + vec2<i32>(size)) % vec2<i32>(size);
    return aliveSrc[idx(loc)].alive; // NEW!!
}
Now our update function is going to be a bit more complicated. The heat map will work as follows, an alive cell will have a heat of 255 and a dead cell,
will subtract 1 from its heat each frame. We will color dead cells with the heat value provided, so it will dwindle as they remain dead.
@compute @workgroup_size(8, 8, 1)
fn update(@builtin(global_invocation_id) invocation_id: vec3<u32>) {
    let location = vec2<i32>(invocation_id.xy);
    let num_neighbors = count_neighbors_simple(location);
    var cell = get_cell(location);  // NEW!!
    let is_alive = bool(cell.alive);  // NEW!!

    var result: u32 = 0u;
    var heat: u32 = cell.heat; // NEW!!

    if (is_alive) {
        result = ((u32((num_neighbors) == (2u))) | (u32((num_neighbors) == (3u))));
    } else {
        result = u32((num_neighbors) == (3u));
    }

    var color: vec4<f32> = vec4<f32>(f32(result), 0., 0., 1.);
    if (bool(result)){
        heat = 255u;
    } else {
        color = vec4<f32>(0., 0., 0., 1.);

        if (heat > 0u){
            heat -= 1u;
            color = vec4<f32>(0., 0., f32(heat) / 255., 1.0);
        }
    }

    aliveDts[idx(location)] = Cell(result, heat);
    textureStore(texture, location, color);
}
So we grab our current cell, and run the same ruleset we did previously with Conway's Game of Life. The new addition is checking if the
cell is alive or dead. If alive, we set the heat to 255 and the color will be red. If dead AND heat is greater than 0 we subtract 1
from the heat, and color the cell with the heat value in the blue channel. Otherwise, the cell is colored black.
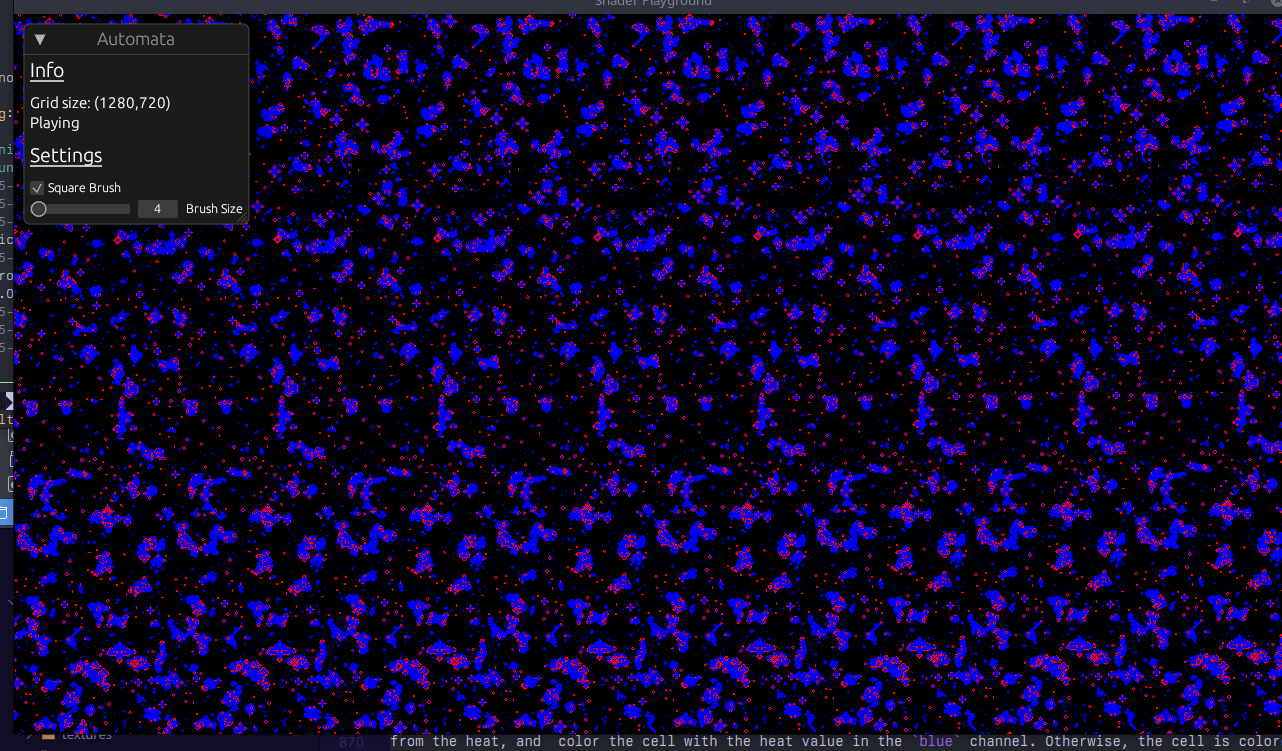
We lost the ability to draw our cells, but it is a simple fix and a nice challenge!
Challenge-1: Convert the draw pipeline and draw shader to use the new buffers! Hint: We only need 1 buffer to write to in the draw shader.
Challenge-2: Create a third pipeline called
ColorPipelinethat will take in thealiveDtsbuffer and color the cells based on their heat value instead of coloring them within ourgame_of_lifeshader.
Challenge Spoiler 1
draw.rs
use bevy::{
    prelude::*,
    render::{render_graph, render_resource::*, renderer::*, RenderSet},
};
use std::borrow::Cow;

use crate::{input::AutomataParams, NUM_OF_CELLS, SIM_SIZE, WORKGROUP_SIZE};

use super::automata::{AutomataTextureBindGroup, GameOfLifeBuffers};

pub struct AutomataDrawPipelinePlugin;
impl Plugin for AutomataDrawPipelinePlugin {
    fn build(&self, render_app: &mut App) {
        render_app
            .init_resource::<AutomataDrawPipeline>()
            .add_system(queue_draw_bind_group.in_set(RenderSet::Queue));
    }
}

// ================================== Contants ================================== //

#[repr(C)]
#[derive(Copy, Clone, bytemuck::Pod, bytemuck::Zeroable)]
pub struct AutomataPushConstants {
    draw_start: [f32; 2],
    draw_end: [f32; 2],
    draw_radius: f32,
    draw_square: u32,
}

impl AutomataPushConstants {
    pub fn new(draw_start: Vec2, draw_end: Vec2, draw_radius: f32, draw_square: bool) -> Self {
        Self {
            draw_radius,
            draw_end: draw_end.to_array(),
            draw_square: draw_square as u32,
            draw_start: draw_start.to_array(),
        }
    }
}

// ================================== Pipeline ================================== //

#[derive(Resource)]
pub struct AutomataDrawPipeline {
    draw_pipeline: CachedComputePipelineId,
    draw_bind_group_layout: BindGroupLayout,
}

impl FromWorld for AutomataDrawPipeline {
    fn from_world(world: &mut World) -> Self {
        let pipeline_cache = world.resource::<PipelineCache>();

        let draw_bind_group_layout =
            world
                .resource::<RenderDevice>()
                .create_bind_group_layout(&BindGroupLayoutDescriptor {
                    label: Some("Game of Life Draw Bind Group Layout"),
                    entries: &[
                        BindGroupLayoutEntry {
                            binding: 0,
                            count: None,
                            visibility: ShaderStages::COMPUTE,
                            ty: BindingType::Buffer {
                                ty: BufferBindingType::Uniform,
                                has_dynamic_offset: false,
                                min_binding_size: BufferSize::new(
                                    (2 * std::mem::size_of::<u32>()) as _,
                                ),
                            },
                        },
                        BindGroupLayoutEntry {
                            binding: 1,
                            count: None,
                            visibility: ShaderStages::COMPUTE,
                            ty: BindingType::Buffer {
                                ty: BufferBindingType::Storage { read_only: false },
                                has_dynamic_offset: false,
                                min_binding_size: BufferSize::new(
                                    (2 * NUM_OF_CELLS * std::mem::size_of::<u32>()) as _,
                                ),
                            },
                        },
                    ],
                });

        let brush_shader = world.resource::<AssetServer>().load("shaders/draw.wgsl");

        let draw_pipeline = pipeline_cache.queue_compute_pipeline(ComputePipelineDescriptor {
            shader: brush_shader,
            shader_defs: vec![],
            entry_point: Cow::from("draw"),
            layout: vec![draw_bind_group_layout.clone()],
            label: Some(std::borrow::Cow::Borrowed("Game of Life Draw Pipeline")),
            push_constant_ranges: [PushConstantRange {
                stages: ShaderStages::COMPUTE,
                range: 0..std::mem::size_of::<AutomataPushConstants>() as u32,
            }]
            .to_vec(),
        });

        AutomataDrawPipeline {
            draw_pipeline,
            draw_bind_group_layout,
        }
    }
}

// ================================== BindGroup ================================== //

#[derive(Resource)]
struct AutomataDrawBindGroup(pub BindGroup);

pub fn queue_draw_bind_group(
    mut commands: Commands,
    render_device: Res<RenderDevice>,

    params: Res<AutomataParams>,
    buffers: Res<GameOfLifeBuffers>,
    pipeline: Res<AutomataDrawPipeline>,
) {
    let draw_bind_group = render_device.create_bind_group(&BindGroupDescriptor {
        label: Some("Game of Life Draw Bind Group"),
        layout: &pipeline.draw_bind_group_layout,
        entries: &[
            BindGroupEntry {
                binding: 0,
                resource: buffers.uniform_buffer.as_entire_binding(),
            },
            BindGroupEntry {
                binding: 1,
                resource: buffers.in_out_buffers[*params.frame.lock() % 2].as_entire_binding(),
            },
        ],
    });
    commands.insert_resource(AutomataDrawBindGroup(draw_bind_group));
}

// ================================== Nodes ================================== //
pub enum AutomataDrawState {
    Loading,
    Update,
}

pub struct AutomataDrawNode {
    state: AutomataDrawState,
}

impl Default for AutomataDrawNode {
    fn default() -> Self {
        Self {
            state: AutomataDrawState::Loading,
        }
    }
}

impl render_graph::Node for AutomataDrawNode {
    fn update(&mut self, world: &mut World) {
        let pipeline_cache = world.resource::<PipelineCache>();
        let pipeline = world.resource::<AutomataDrawPipeline>();

        // if the corresponding pipeline has loaded, transition to the next stage
        match self.state {
            AutomataDrawState::Loading => {
                if let CachedPipelineState::Ok(_) =
                    pipeline_cache.get_compute_pipeline_state(pipeline.draw_pipeline)
                {
                    self.state = AutomataDrawState::Update;
                }
            }
            AutomataDrawState::Update => {}
        }
    }

    fn run(
        &self,
        _graph: &mut render_graph::RenderGraphContext,
        render_context: &mut RenderContext,
        world: &World,
    ) -> Result<(), render_graph::NodeRunError> {
        let params = &world.resource::<AutomataParams>();

        if params.is_drawing {
            let texture_bind_group = &world.resource::<AutomataTextureBindGroup>().0;
            let draw_bind_group = &world.resource::<AutomataDrawBindGroup>().0;
            let pipeline_cache = world.resource::<PipelineCache>();
            let pipeline = world.resource::<AutomataDrawPipeline>();

            let mut pass = render_context
                .command_encoder()
                .begin_compute_pass(&ComputePassDescriptor::default());

            pass.set_bind_group(0, texture_bind_group, &[]);

            // select the pipeline based on the current state
            match self.state {
                AutomataDrawState::Loading => {}
                AutomataDrawState::Update => {
                    let draw_pipeline = pipeline_cache
                        .get_compute_pipeline(pipeline.draw_pipeline)
                        .unwrap();

                    let pc = AutomataPushConstants::new(
                        params.mouse_pos,
                        params.prev_mouse_pos,
                        params.radius,
                        params.use_square_brush,
                    );

                    pass.set_pipeline(draw_pipeline);
                    pass.set_bind_group(0, draw_bind_group, &[]);
                    pass.set_push_constants(0, bytemuck::cast_slice(&[pc]));
                    pass.dispatch_workgroups(
                        SIM_SIZE.0 / WORKGROUP_SIZE,
                        SIM_SIZE.1 / WORKGROUP_SIZE,
                        1,
                    );
                }
            }
        }

        Ok(())
    }
}
draw.wgsl
#import bevy_shader_playground::core

@group(0) @binding(0)
var<uniform> size : vec2<u32>; // width, height
@group(0) @binding(1)
var<storage, read_write> aliveDts : array<Cell>;

// Line v->w, point p
// https://stackoverflow.com/questions/849211/shortest-distance-between-a-point-and-a-line-segment
fn closest_point_on_line(v: vec2<f32>, w: vec2<f32>, p: vec2<f32>) -> vec2<f32> {
    let c = v - w;
    // length squared
    let l2 = dot(c, c);
    if (l2 == 0.0) {
        return v;
    }
    let t = max(0.0, min(1.0, dot(p - v, w - v) / l2));
    let projection = v + t * (w - v);
    return projection;
}

fn draw_particle_circle(pos: vec2<f32>, draw_pos: vec2<f32>, radius: f32) {
    let y_start = draw_pos.y - radius;
    let y_end = draw_pos.y + radius;
    let x_start = draw_pos.x - radius;
    let x_end = draw_pos.x + radius;
    if (pos.x >= x_start && pos.x <= x_end && pos.y >= y_start && pos.y <= y_end) {
        let diff = pos - draw_pos;
        let dist = length(diff);
        if (round(dist) <= radius) {
            aliveDts[idx(vec2<i32>(pos))] = new_cell(true);
        }
    }
}

fn draw_particle_square(pos: vec2<f32>, draw_pos: vec2<f32>, size: f32)  {
    let y_start = draw_pos.y - size / 2.;
    let y_end = draw_pos.y + size / 2.;
    let x_start = draw_pos.x - size / 2.;
    let x_end = draw_pos.x + size / 2.;
    if (pos.x >= x_start && pos.x <= x_end && pos.y >= y_start && pos.y <= y_end) {
        aliveDts[idx(vec2<i32>(pos))] = new_cell(true);
    }
}

@compute @workgroup_size(8, 8, 1)
fn draw(@builtin(global_invocation_id) invocation_id: vec3<u32>)
{
    let pixel = vec2<u32>(invocation_id.xy);
    if (pixel.x >= size.x && pixel.y >= size.y) {
        return ;
    }

    if (pc.draw_radius > 0.0) {
        let pos = vec2<f32>(pixel);
        let point_on_line = closest_point_on_line(pc.draw_start, pc.draw_end, pos);

        if (bool(pc.draw_square)){
            draw_particle_square(pos, point_on_line, pc.draw_radius);
        }else{
            draw_particle_circle(pos, point_on_line, pc.draw_radius);
        }
    }
}
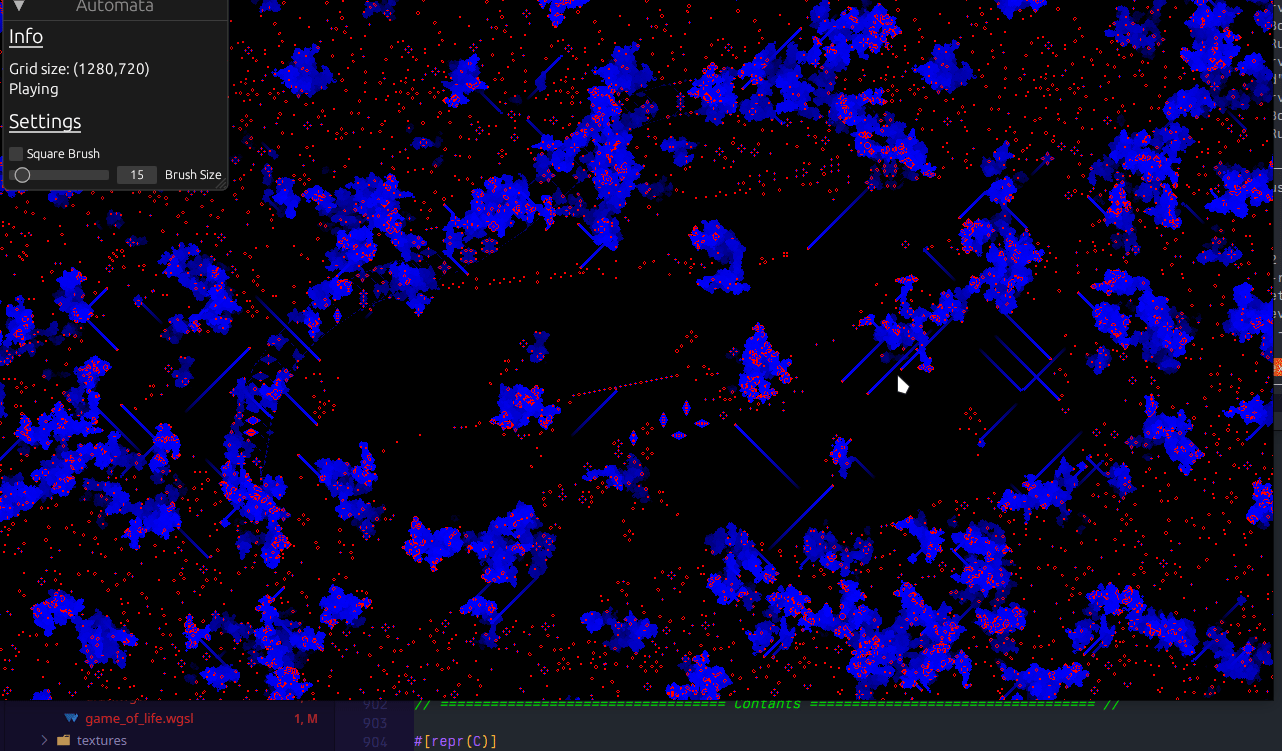
Challenge 2 along with the full source code can be found on github: Part 5